Cauliflower Crust Pizza.

This recipe is a tribute to a friend who so generously acted as beauty consultant / hair colorist for me yesterday. To thank her, I made these gluten-free pizzas, which are completely delicious whether g-free is your lifestyle (hers) or not (mine). Though gluten is fine by me, I’ve found that a lot of the things I love to cook (and eat) are already gluten-free. So when I find a recipe, like this one, that is totally dreamy and healthy AND fits in with the g-free life, I love to share it. This is one of those! I came upon essentially the same ingenious recipe on 3 of my favorite blogs, and this is my version of that awesomely tasty and healthy pizza. Yum! And thanks Jeni!

IMG_7186

INGREDIENTS

for crust:
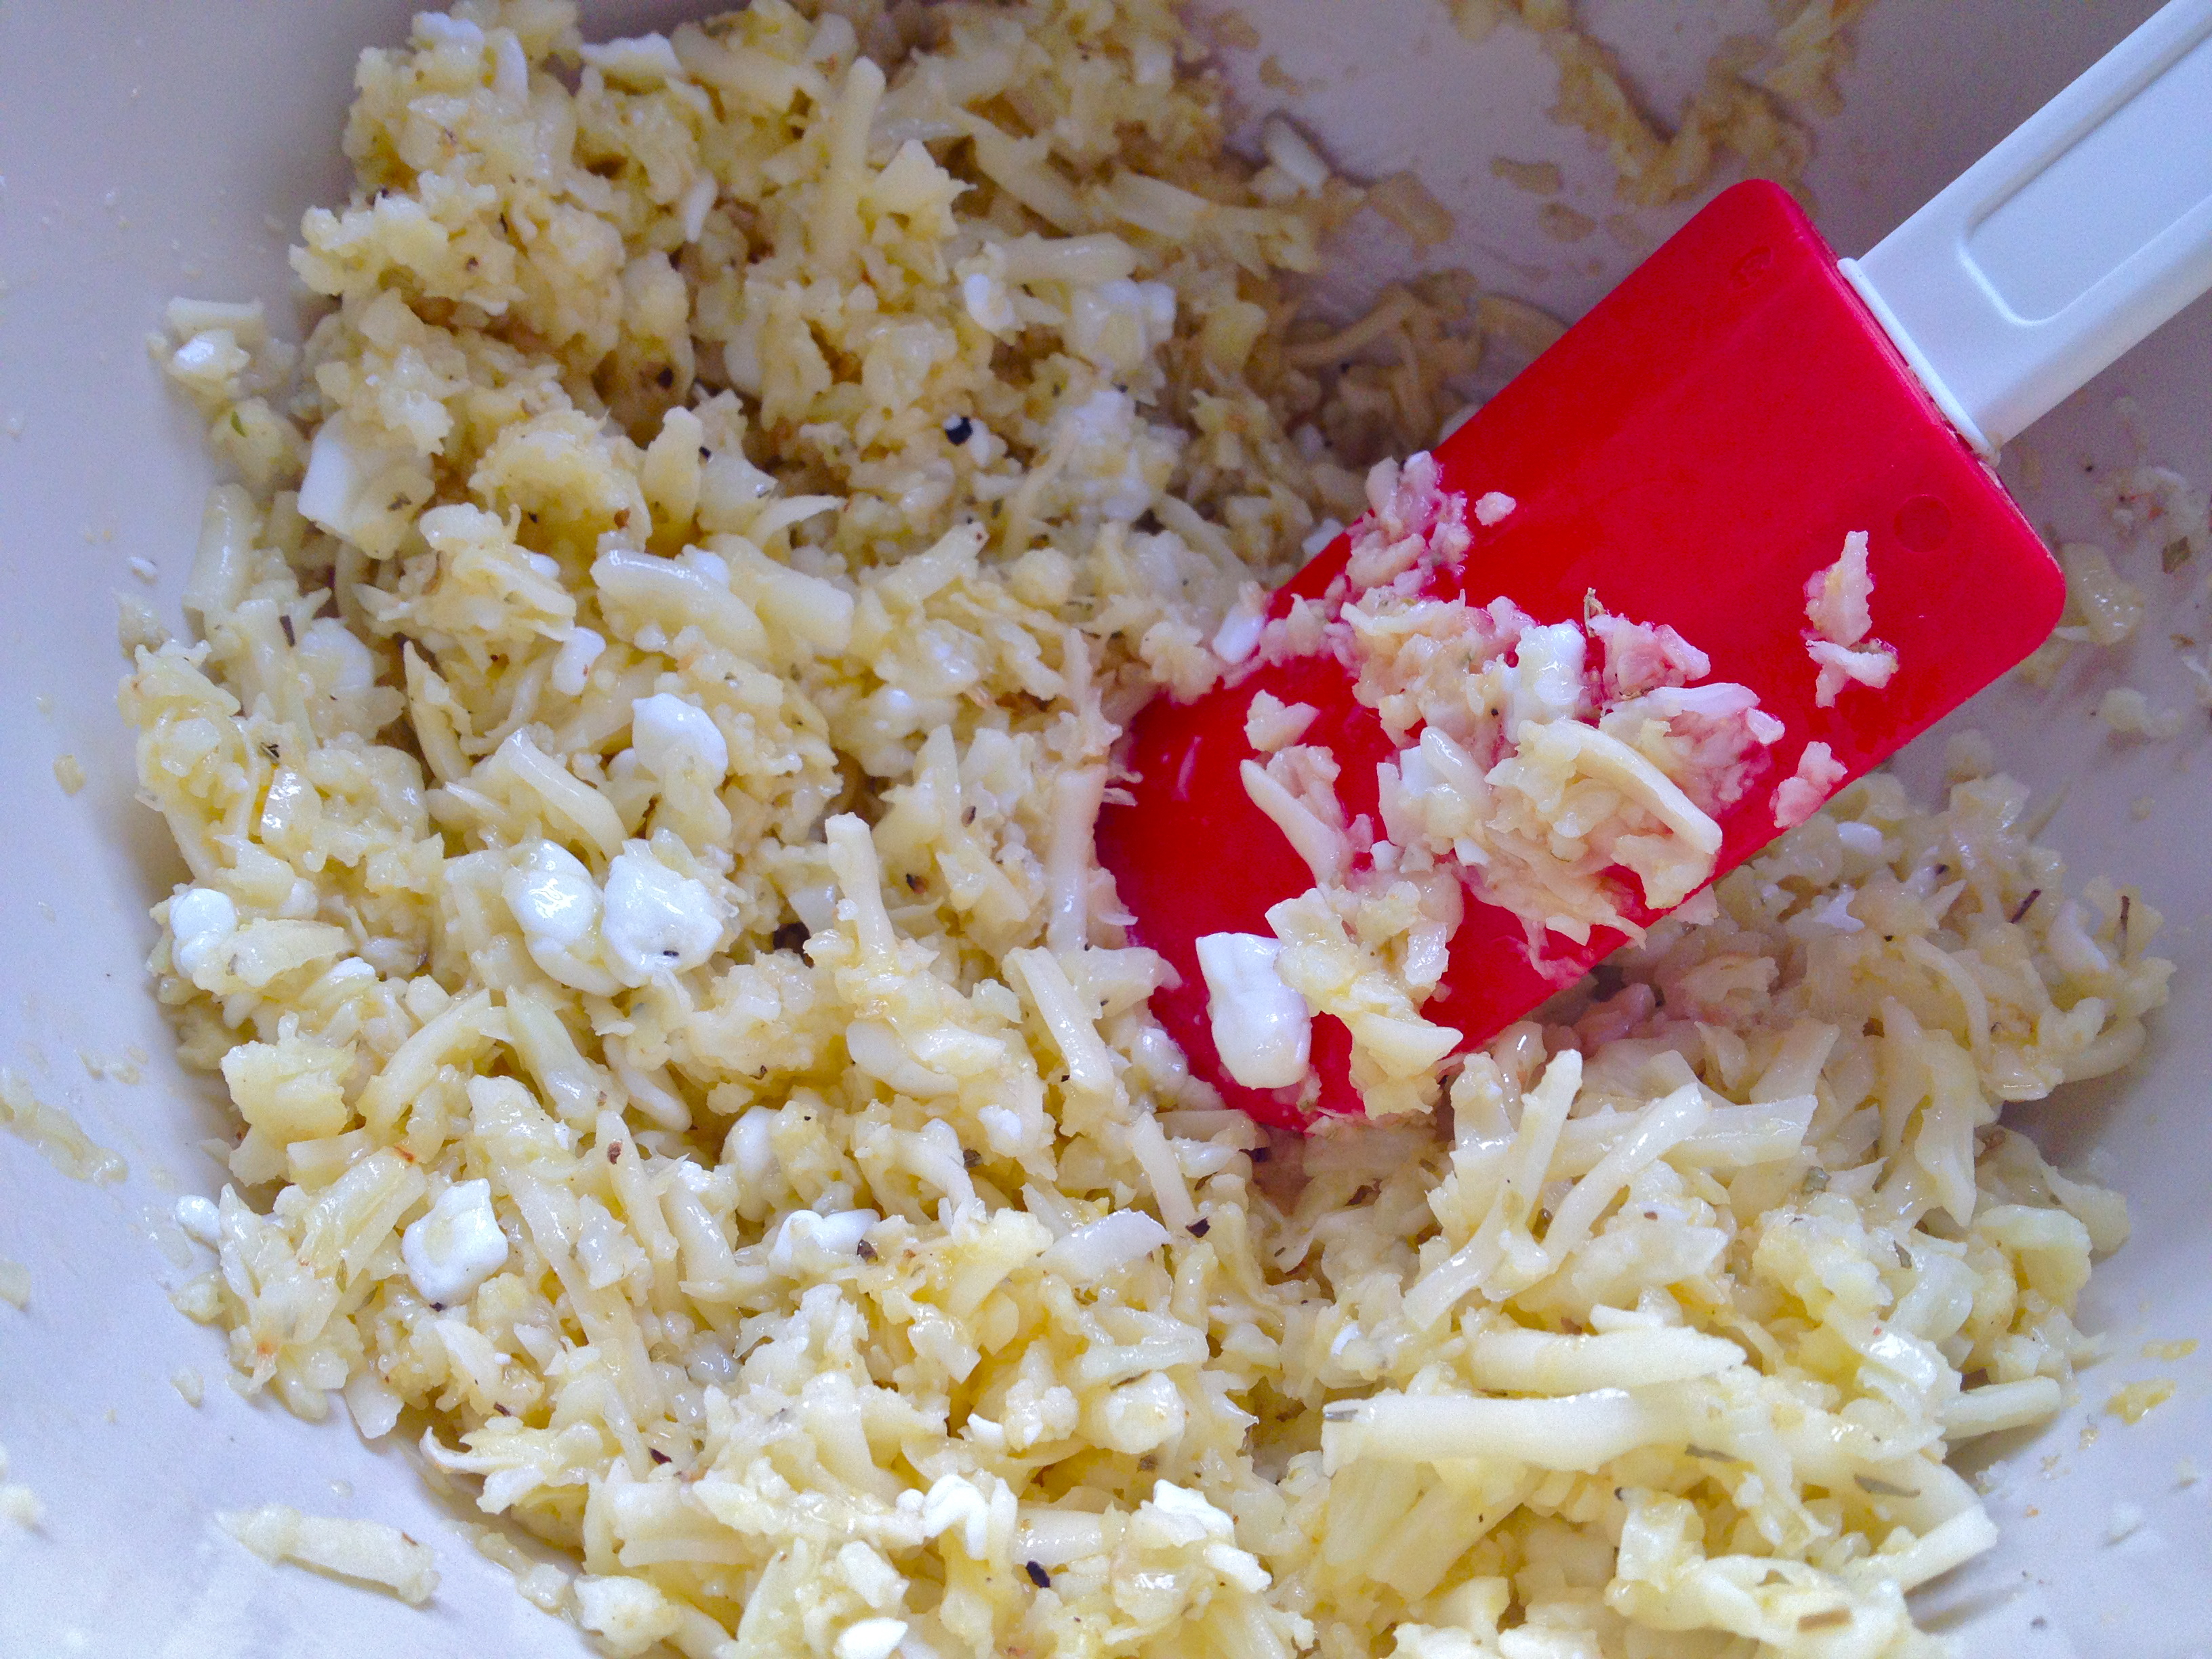
2 cups cauliflower stems and florets, grated
1 cup mozzarella cheese, shredded
oregano and granulated garlic to taste
1 egg
salt and pepper
2-3 tbsp cottage cheese, to hold it together

topping ideas:
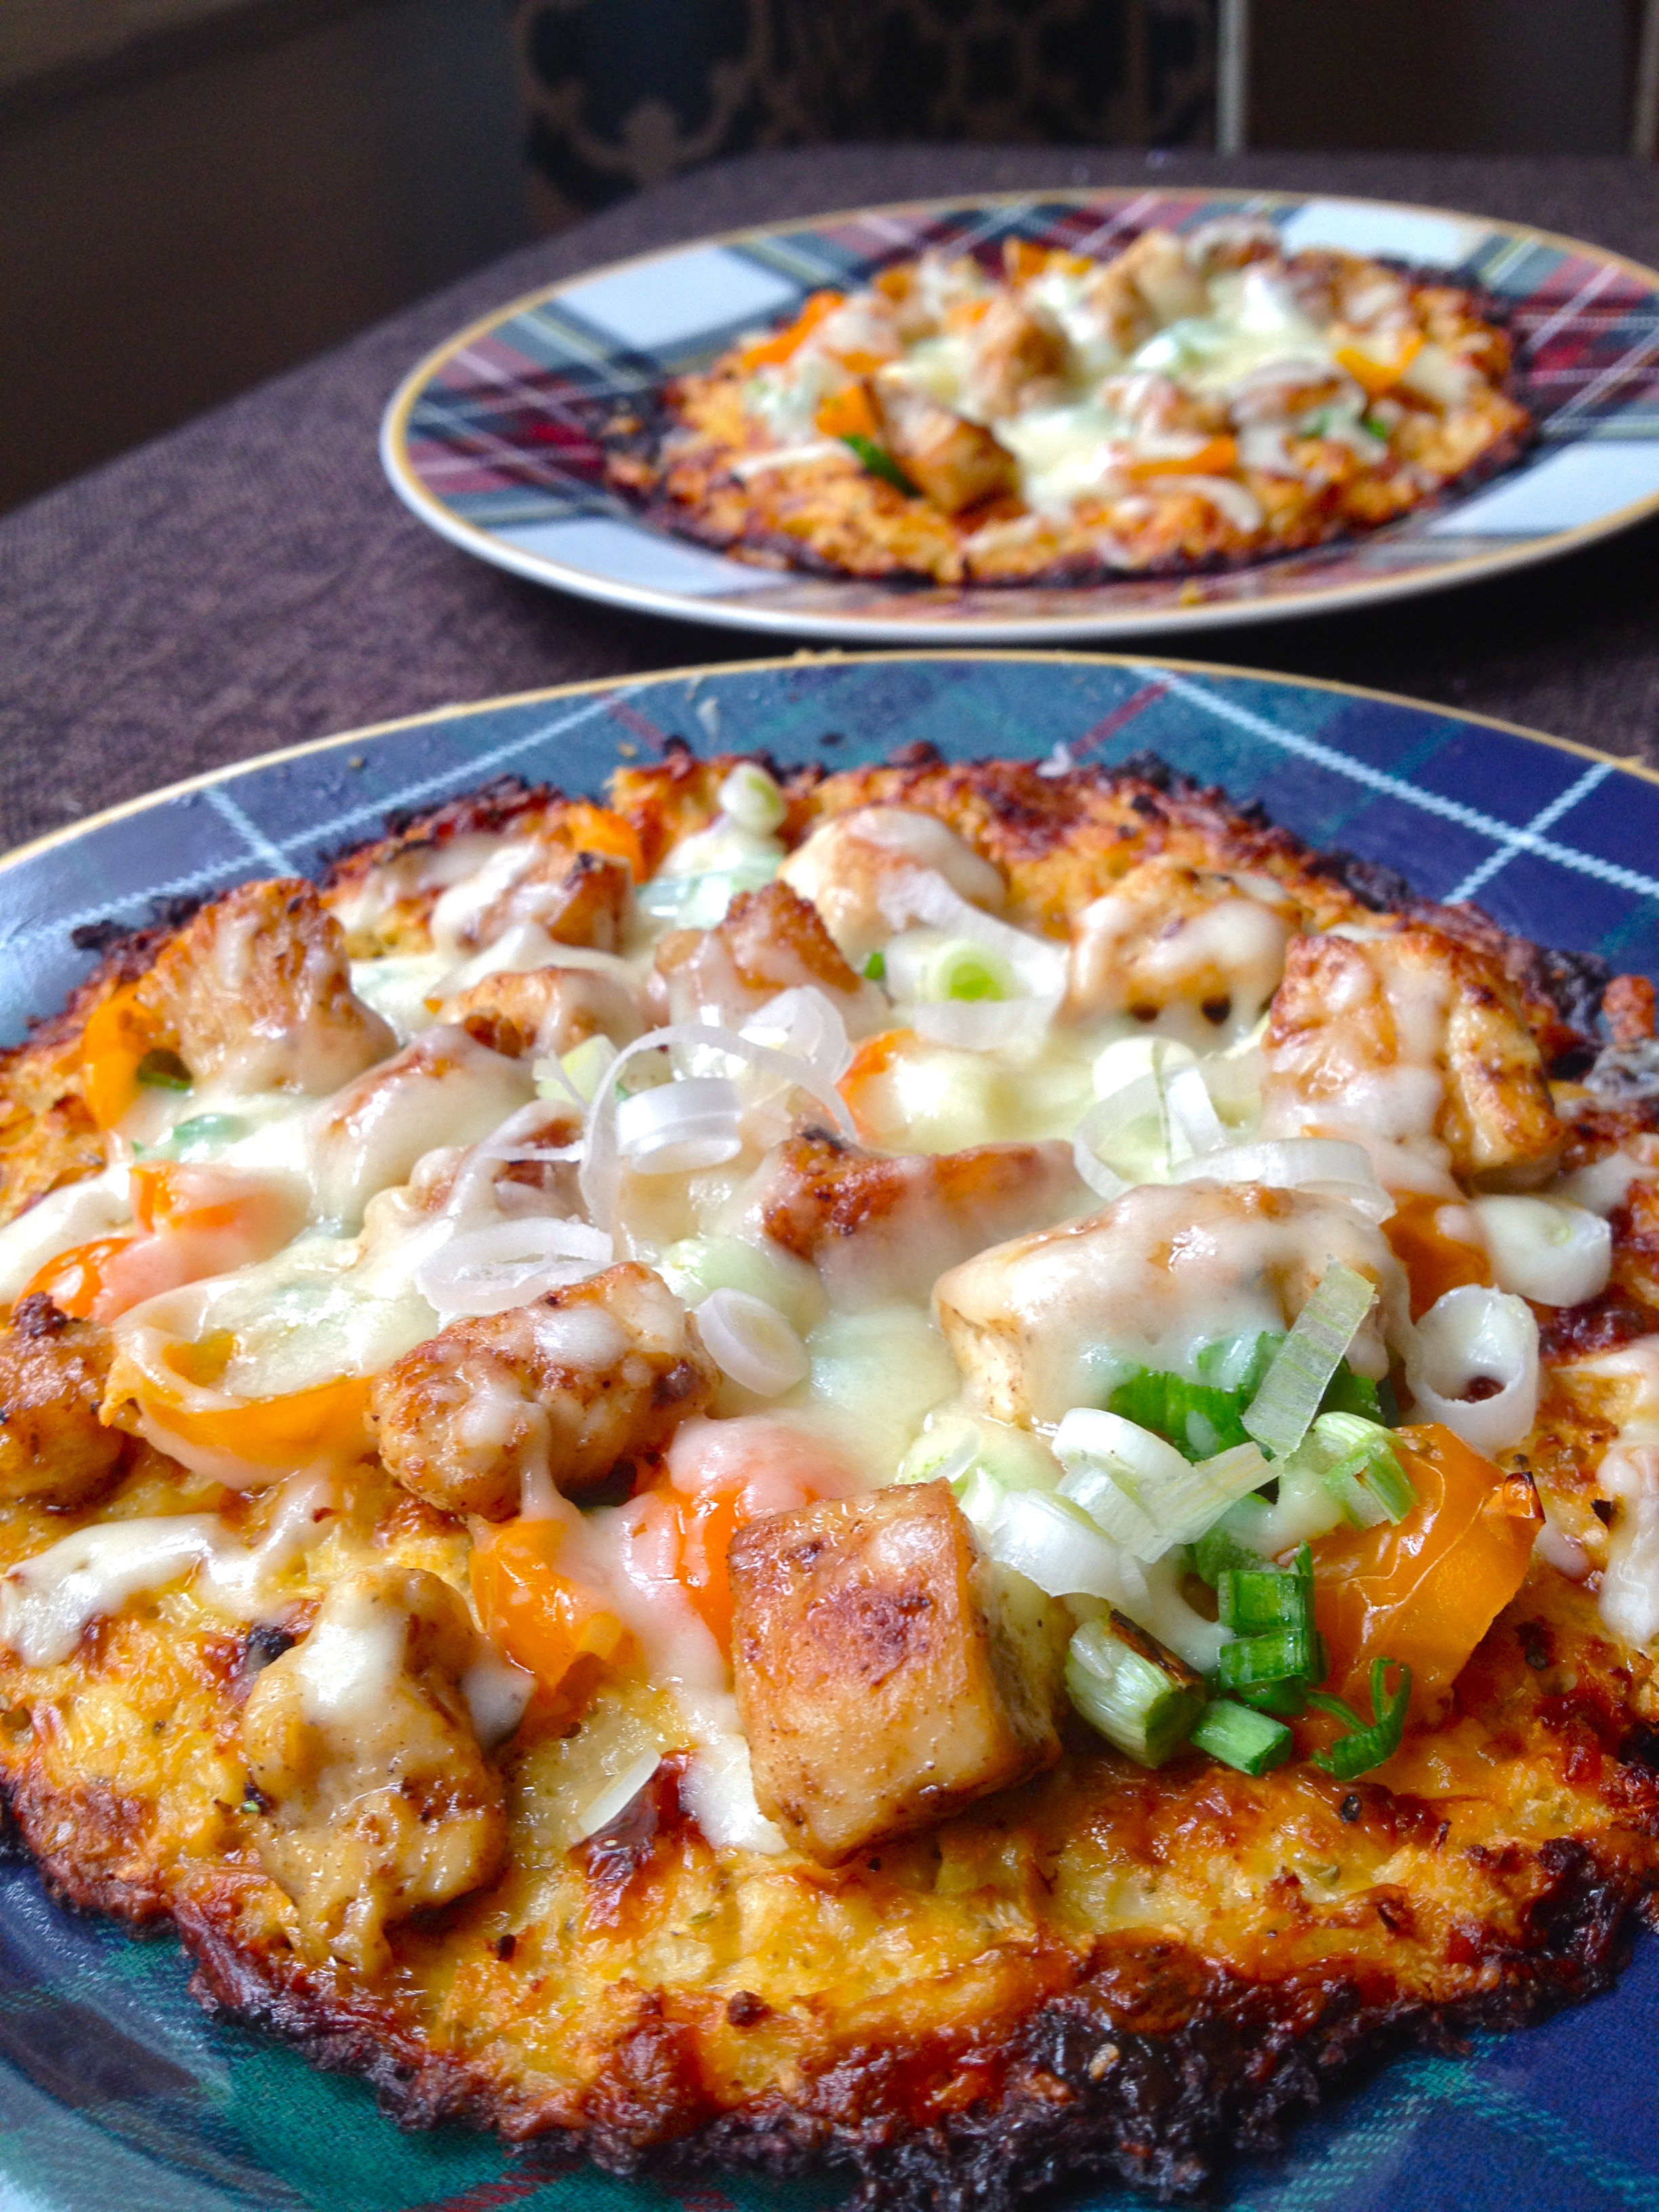
1/2 cubed chicken breast, sauteed with salt, pepper, and paprika
shredded mozzarella
grape tomatoes, quartered
green onions, chopped

Just the Recipe link: Cauliflower Crust Pizza

DIRECTIONS

Preheat oven to 450 F.

First, put the grated cauliflower into a bowl and microwave for 7 minutes, covered with a washcloth or paper towel. When it’s cooked, mix all the crust ingredients in a bowl. Use more or less cottage cheese, depending on how dry the mixture is and how it’s holding together.

IMG_7177

On a greased baking pan, shape the cauliflower mixture into two flat discs, as thick or thin as you like.

IMG_7178

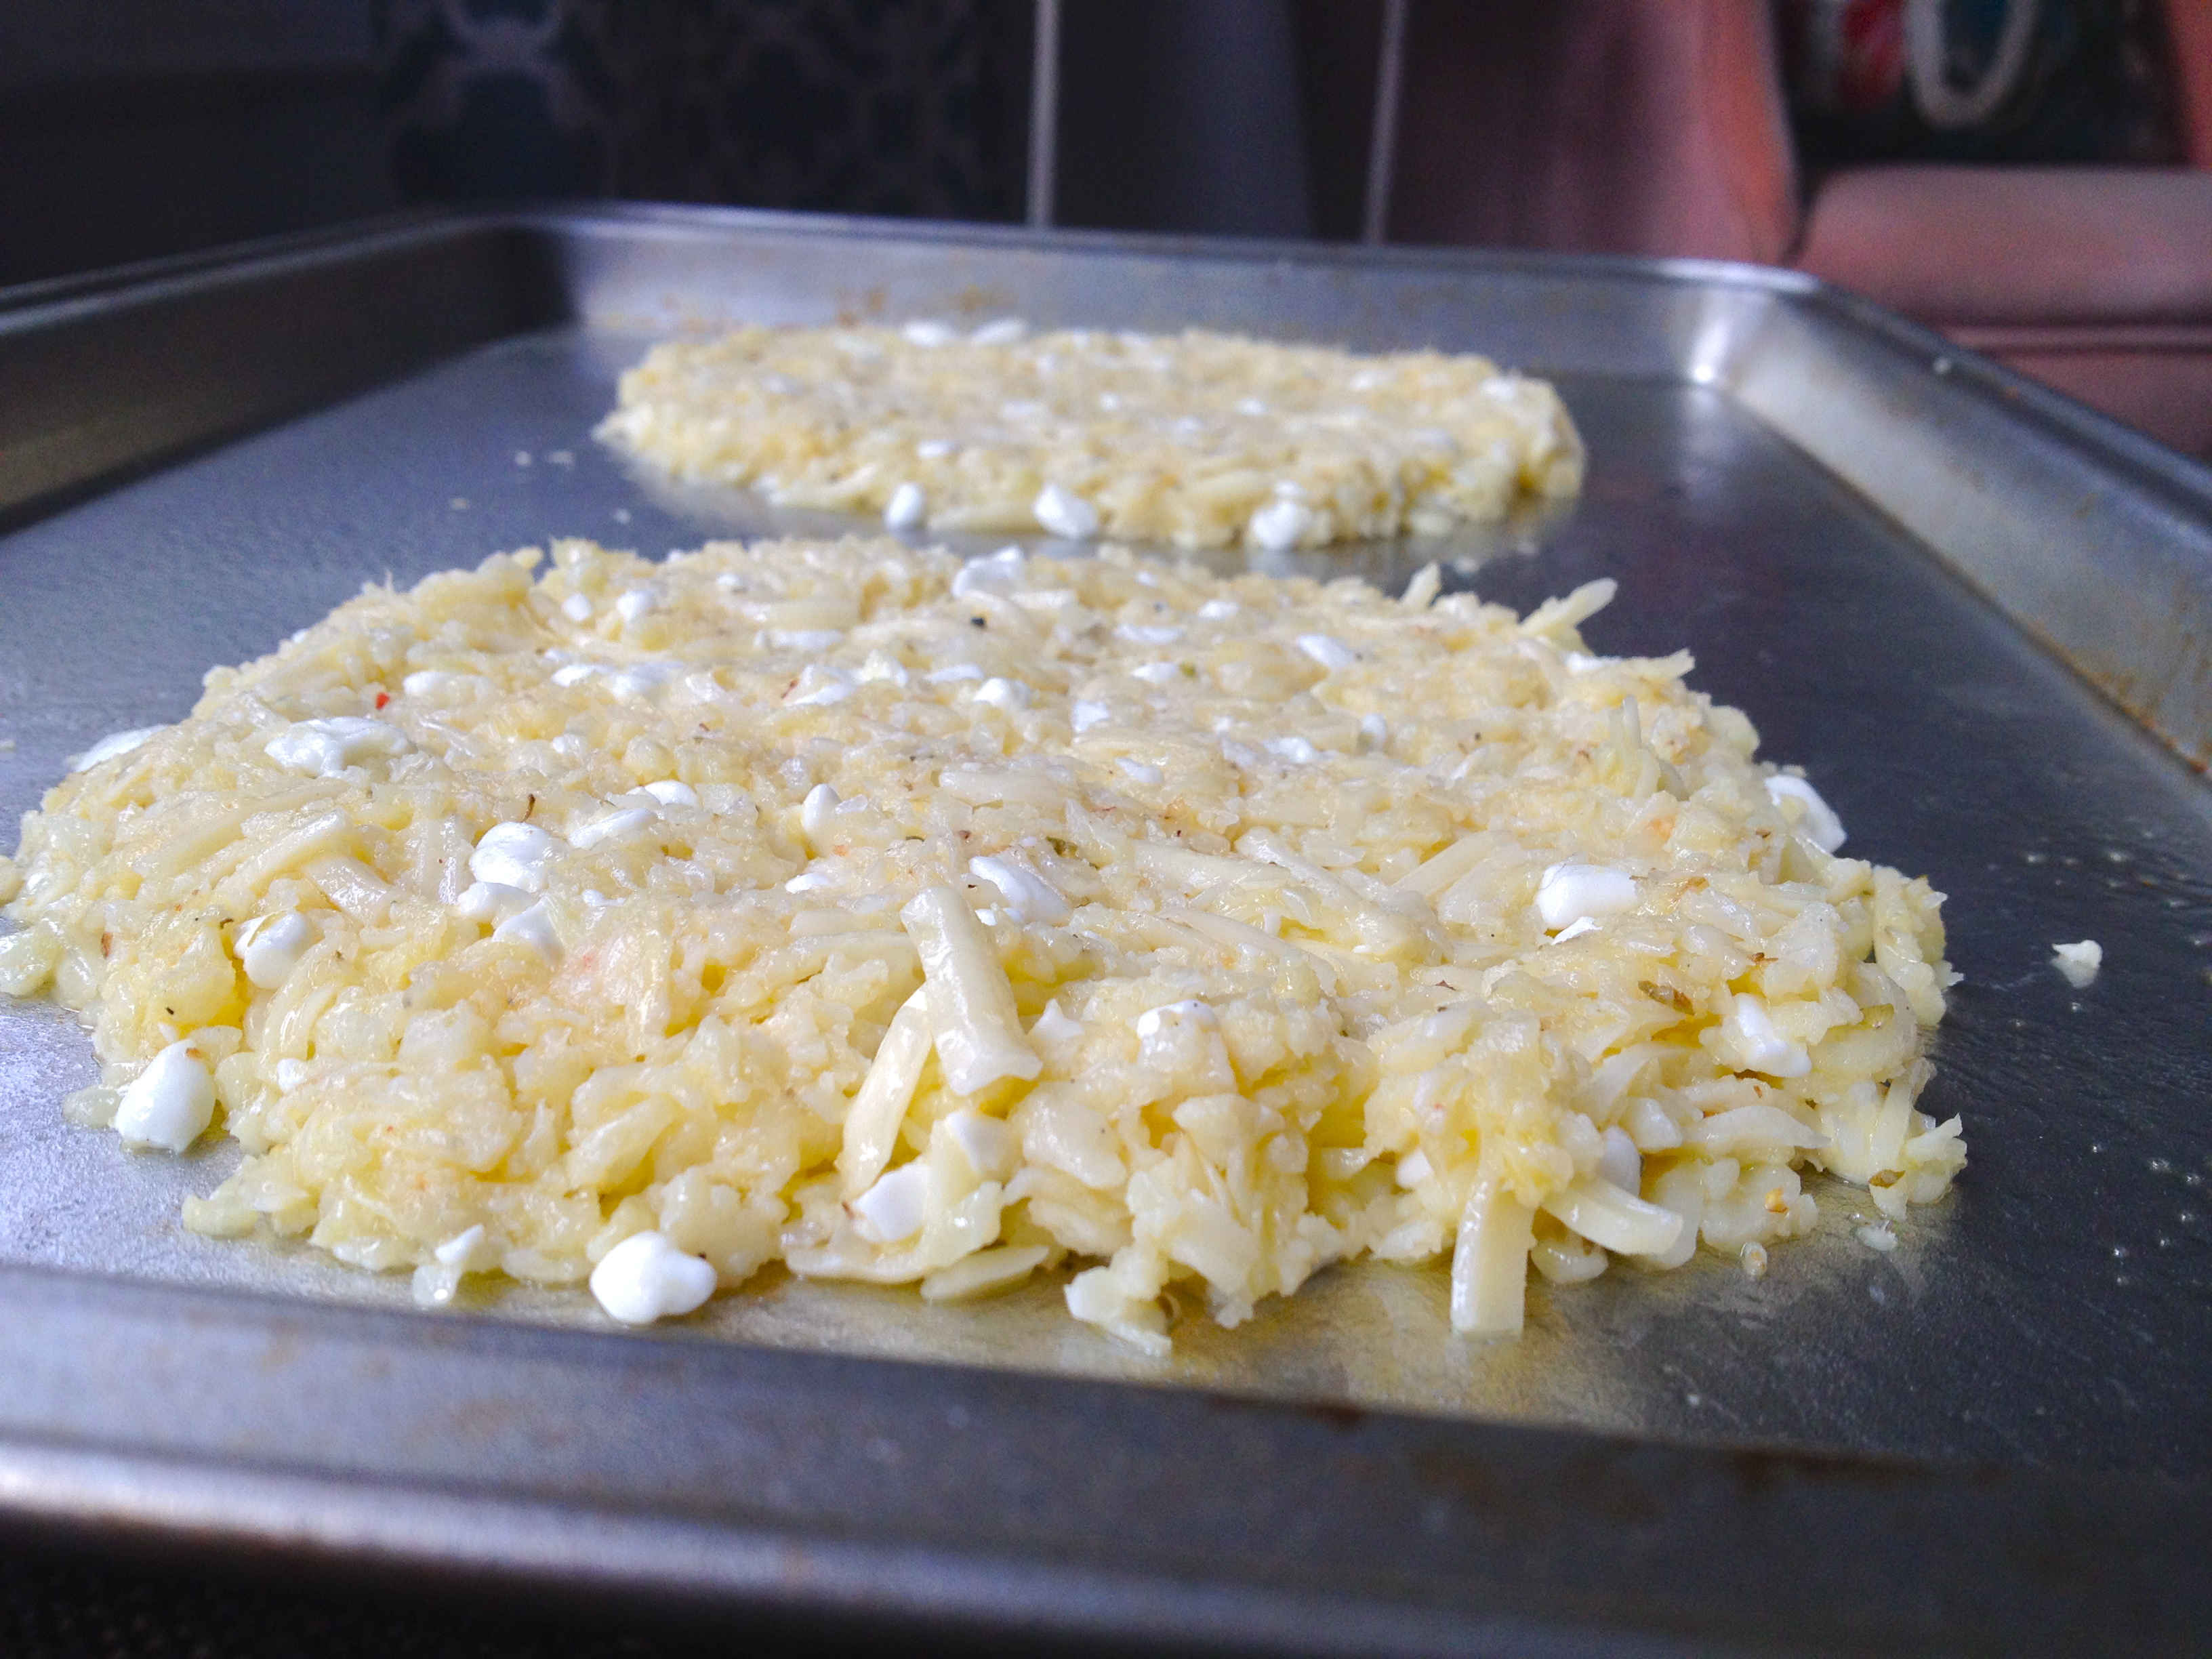
Bake them for about 15 minutes, or until the edges are browned and the top is flecked with bits of golden melted cheese. The thickness of the crusts will affect baking time, so make sure to keep an eye on them.

IMG_7181

Once the crusts come out of the oven, I use a spatula to loosen them from the bottom of the pan and make sure they come off in one piece, because this will be a lot harder to do once they’re topped with cheese and other wonderful things.

Before you start with the toppings, turn up your oven to broil (or to very, very hot!). The pizzas only have a few minutes left to cook, and we want to do it at a high heat.

On to the beautiful toppings. They can truly be whatever you want – we went with chicken, green onion, tomato, and cheese, and they were fantastic!

IMG_7183

Stick back in the oven for 3-5 minutes, until the cheese is melted and has started to turn a little golden. Sprinkle with some more green onion or some oregano and dig in!

IMG_7185

Advertisement

Pea and Asparagus Risotto.

I get so excited when I’m out to lunch or dinner and I see a special risotto on the menu, and I almost always order it. I just think it doesn’t get any better than creamy, cheesey risotto, especially with some perky green vegetables in the mix. That’s why I made it for dinner this week! Risotto has a reputation as a hassle of a homemade dish, but I think that’s rather harsh and undeserved. It’s not that it’s at all difficult to make, it’s just that it takes some effort. In fact, risotto is actually pretty easy, if you can handle a bit of extended stirring in front of the stove. So if you find yourself with a free evening and you’re feeling like cooking up something special, risotto is definitely the perfect dish. Every time I make it, I’m amazed at how beautifully creamy it becomes—why is it so darn good?!

INGREDIENTS

1 bunch of asparagus, ends trimmed
4-6 cups chicken stock (vegetable stock is fine too)
3 green onions, sliced
olive oil
2 cups arborio rice
1 cup dry white wine
3/4 cup frozen peas
1/2 cup Parmesan cheese, shredded
fresh parsley, chopped
lemon zest, to taste (I like just a pinch)
salt and pepper to taste

DIRECTIONS

Because risotto demands your full attention, make sure to have everything prepped before you start. First, blanche your asparagus in a shallow pan of boiling water until just barely tender but still crisp, about 2 minutes, and then plunge them into an ice bath to stop the cooking process. Chop the asparagus into bite-sized pieces and set aside.

In a saucepan, heat stock to a low simmer and continue to simmer it, so that it’s nice and hot when you add it to the risotto. Cold stock will interfere with the rice cooking process because it will need to heat up each time you add it, so this step is important.

Now heat a Dutch oven or other large pot over medium to low heat. Oil the pan and add the green onion and a pinch of salt. Cook about 2 minutes, stirring occasionally, and then add the rice. Stir well and cook the rice until the sides are transparent and you see an opaque white spot in the center, about 3-5 minutes. That means it’s time to start adding the liquid!

First, pour in the wine and stir until almost all of the liquid is absorbed. Then, add the first ladle of stock—just enough to submerge all the rice.

Stir almost constantly as the rice absorbs the stock. Once nearly all this stock is absorbed, add the next ladle, again just submerging the rice. Repeat this process until you add your final ladle of stock.

Once you’ve added the last bit of stock, drop in the asparagus and peas. Then stir until all the stock is absorbed, and remove form heat. The rice should be creamy and tender, with a little bit of a chewy texture.

Sprinkle in the Parmesan cheese, parsley, lemon zest, and salt and pepper to taste. Serve with an extra sprinkle of cheese and enjoy the fruits of your foodie labor!

Poule au Pot.

Sunday didn’t start out rainy. I woke up at 9:30, and despite feeling a bit low-energy, I grabbed my yoga bag (which I somehow had the foresight to pack the night before) and headed out the door to get my butt kicked for an intense hour and a half. By the time I left the studio, it had become overcast, and a cool, late summer rain was falling. As I walked an umbrella-less mile back to my apartment, I realized it was the perfect weather for that rare and elusive treat: light comfort food. In other words, it was time to make poule au pot! I first saw this peasant’s poached chicken and vegetable dish being prepared on one of my favorite cooking shows, Laura Calder’s French Food at Home. It’s incredibly easy and serves up all beautiful and mellow, with buttery flavors that make you think it’s more indulgent than it is. Since the chicken and veggies are poached, you not only have a very healthy dish on your hands, you’ve also got a whole bonus pot-ful of super-flavorful chicken broth leftover, to do with as you wish. And as for the chicken, I serve it in a pool of hot broth with the veggies and a little pile of quinoa on the side, but let me tell you, it is perfect for chicken salad too. Whatever you do with it, poule au pot has all the warming and homey power of comfort food, with none of the greasy richness. This is the magic of chicken in a pot–what’s not to love?

INGREDIENTS

1 whole chicken
2 bay leaves
5 whole cloves garlic, skin on
1/2 tsp dried thyme
1/2 tsp dried rosemary
1/2 tsp dried sage
1/2 tsp dried parsley
1/2 tsp dried tarragon
salt and pepper to taste
3 turnips, halved
2 parsnips, peeled and cut to about the size of the turnips
3 carrots, peeled and cut to match the parsnips
3 celery stalks, cleaned and cut in two
2 leeks, sliced longways, halved shortways, and washed (I find it’s easier to cut leeks first, then wash them after)
1 onion, quartered (Laura Calder suggests pearl onions, but I didn’t have any)

DIRECTIONS

Place the chicken in a deep pot, breast-side up. Fill the pot with water until it covers the chicken. Add the bay leaves and garlic and bring to a boil. Skim the foam off the surface of the water every few minutes.

After the foam has stopped forming, add the thyme, rosemary, sage, parsley, tarragon, and salt and pepper. Cook on a low boil for 30 minutes.

After 30 minute have passed, flip the chicken over so that the breast side is down. Turn the heat down slightly and cook another 10 minutes.

Next, add the turnips, parsnips, and carrots. Cook for 10 minutes.

Then add the celery and onion. Cook 5 minutes.

Finally, add the leeks to the pot. Cook 5 minutes.

That’s all! After a total of 60 minutes of chicken-poaching, with the veggies staggered so that they’re all just perfectly fork-tender, you’ve got an efficiently glorious dish that will make you pat yourself on the back a few times. My, you’re a good chef. Now eat some chicken.

Unemployed Shepherd’s Pie.

A shepherd without a flock, a shepherd’s pie without any meat. This is an “unemployed shepherd’s pie” because there are no animals being shepherded into it! A little twist on a previous recipe, my vegetable pot pie, this yummy baked veggie and quinoa dish crowned with creamy mashed sweet potatoes is a meatless, gluten-free, almost guilt-free indulgence (there’s a cup of half and half in it, which adds some fat and keeps it from being vegan). A creamy, savory, and super filling dish, it’s also totally versatile, so play around with the veggies. Carrots and celery are always welcome, spinach or leeks would be a great addition, and maybe add a little bit of hot sauce right into the quinoa to provide a bit of a kick. It’s meant to be a flexible, peasant-food-y kind of meal for a chilly, hungry night. Vegetarian comfort food at its best!

INGREDIENTS

2 large sweet potatoes, thoroughly washed
1 cup quinoa
1 1/2 cups vegetable stock
1 medium onion, medium dice
1 small shallot, minced
1 tsp fresh rosemary, minced
1/4 tsp hot paprika
1/4 tsp cumin
salt and pepper to taste
olive oil
2 cloves garlic, minced
1 cup frozen broccoli, cut up
1 cup frozen peas
1 tbsp potato starch or corn starch
2 tbsp soy sauce
2 tbsp white wine
1 tbsp lemon juice
1 cup half and half, divided
1 tsp fresh parsley, chopped

DIRECTIONS

Preheat oven to 400 F.

Pierce each potato a few times and place on a baking sheet. Bake until soft, about an hour. Set aside.

Add quinoa and vegetable broth to a small pan. Bring to a boil, then turn down and simmer until all the liquid is absorbed. Set aside.

Add olive oil to a pan over medium and cook onions, shallots, paprika, cumin, rosemary, salt, and pepper until the onions have softened.

Stir in the garlic and cook 1 minute. Then add broccoli and cook until starting to soften.

Add peas and stir, cook for 30 seconds, and stir in the starch. Turn down the heat to medium low and cook for one minute.

Now add the soy sauce, wine, and lemon juice. Cook for another minute.

Stir in 3/4 cup of half and half and simmer until it becomes like a thick sauce. Remove from heat.

In a large bowl, combine quinoa, vegetable mixture, and parsley.

In another bowl, mash the sweet potatoes, skins on, with the remaining 1/4 cup of half and half.

Spread quinoa mixture into a greased pan and top with the mashed sweet potatoes (mashed if you’re more patient than I was–I just kind of roughed them up a bit and spread them over). Sprinkle with additional salt and pepper if you like.

Bake 1 hour or until the top starts to get crunchy in places. Cool a bit before serving and dig in!