Steamed Artichoke with Harissa Butter.

Let’s use our imaginations for a second. It’s something like 100,000 years ago and you’re a primitive human, walking around and looking for food. You spot a green, tough, pointy-leafed, stringy-stemmed, hairy-hearted and bitter-tasting vegetable. Naturally, you do not eat it. And none of your fellow humans eat it either. It’s clearly a bad food option. You move on and continue your search. Are the berries on that bush non-poisonous? Only one way to find out!

Are you enjoying the imagination game? I find myself thinking about this kind of thing a lot: how many thousands of years had to go by before someone figured out how to prepare an artichoke so that it’s a delicious treat instead of the “problem vegetable” that it is in its untouched state? The artichoke is one of the weirdest vegetables there is, and it’s pretty labor-intensive to prepare, and yet it is all so worth it to get to that delicious heart and eat the meat off the bases of the leaves. Mmmmm.

Despite its baggage, I am a huge fan of these guys, and today I share with you the best artichoke and dressing I have ever eaten. The dressing is a simple combo of melted butter and harissa, a red spiced paste that comes from Tunisia and is usually made from chilis and olive oil. It goes so well with artichokes, I can’t believe I didn’t think of this combo before now. Please please please make this simple recipe as soon as you can – it it magnificent.

IMG_8161

INGREDIENTS (this recipe easily doubles/triples/etc.)

1 artichoke
1 bay leaf
1 tbsp butter
1/4 tsp harissa paste (or more, to taste)

Just the Recipe link: Steamed Artichoke with Harissa Butter

DIRECTIONS

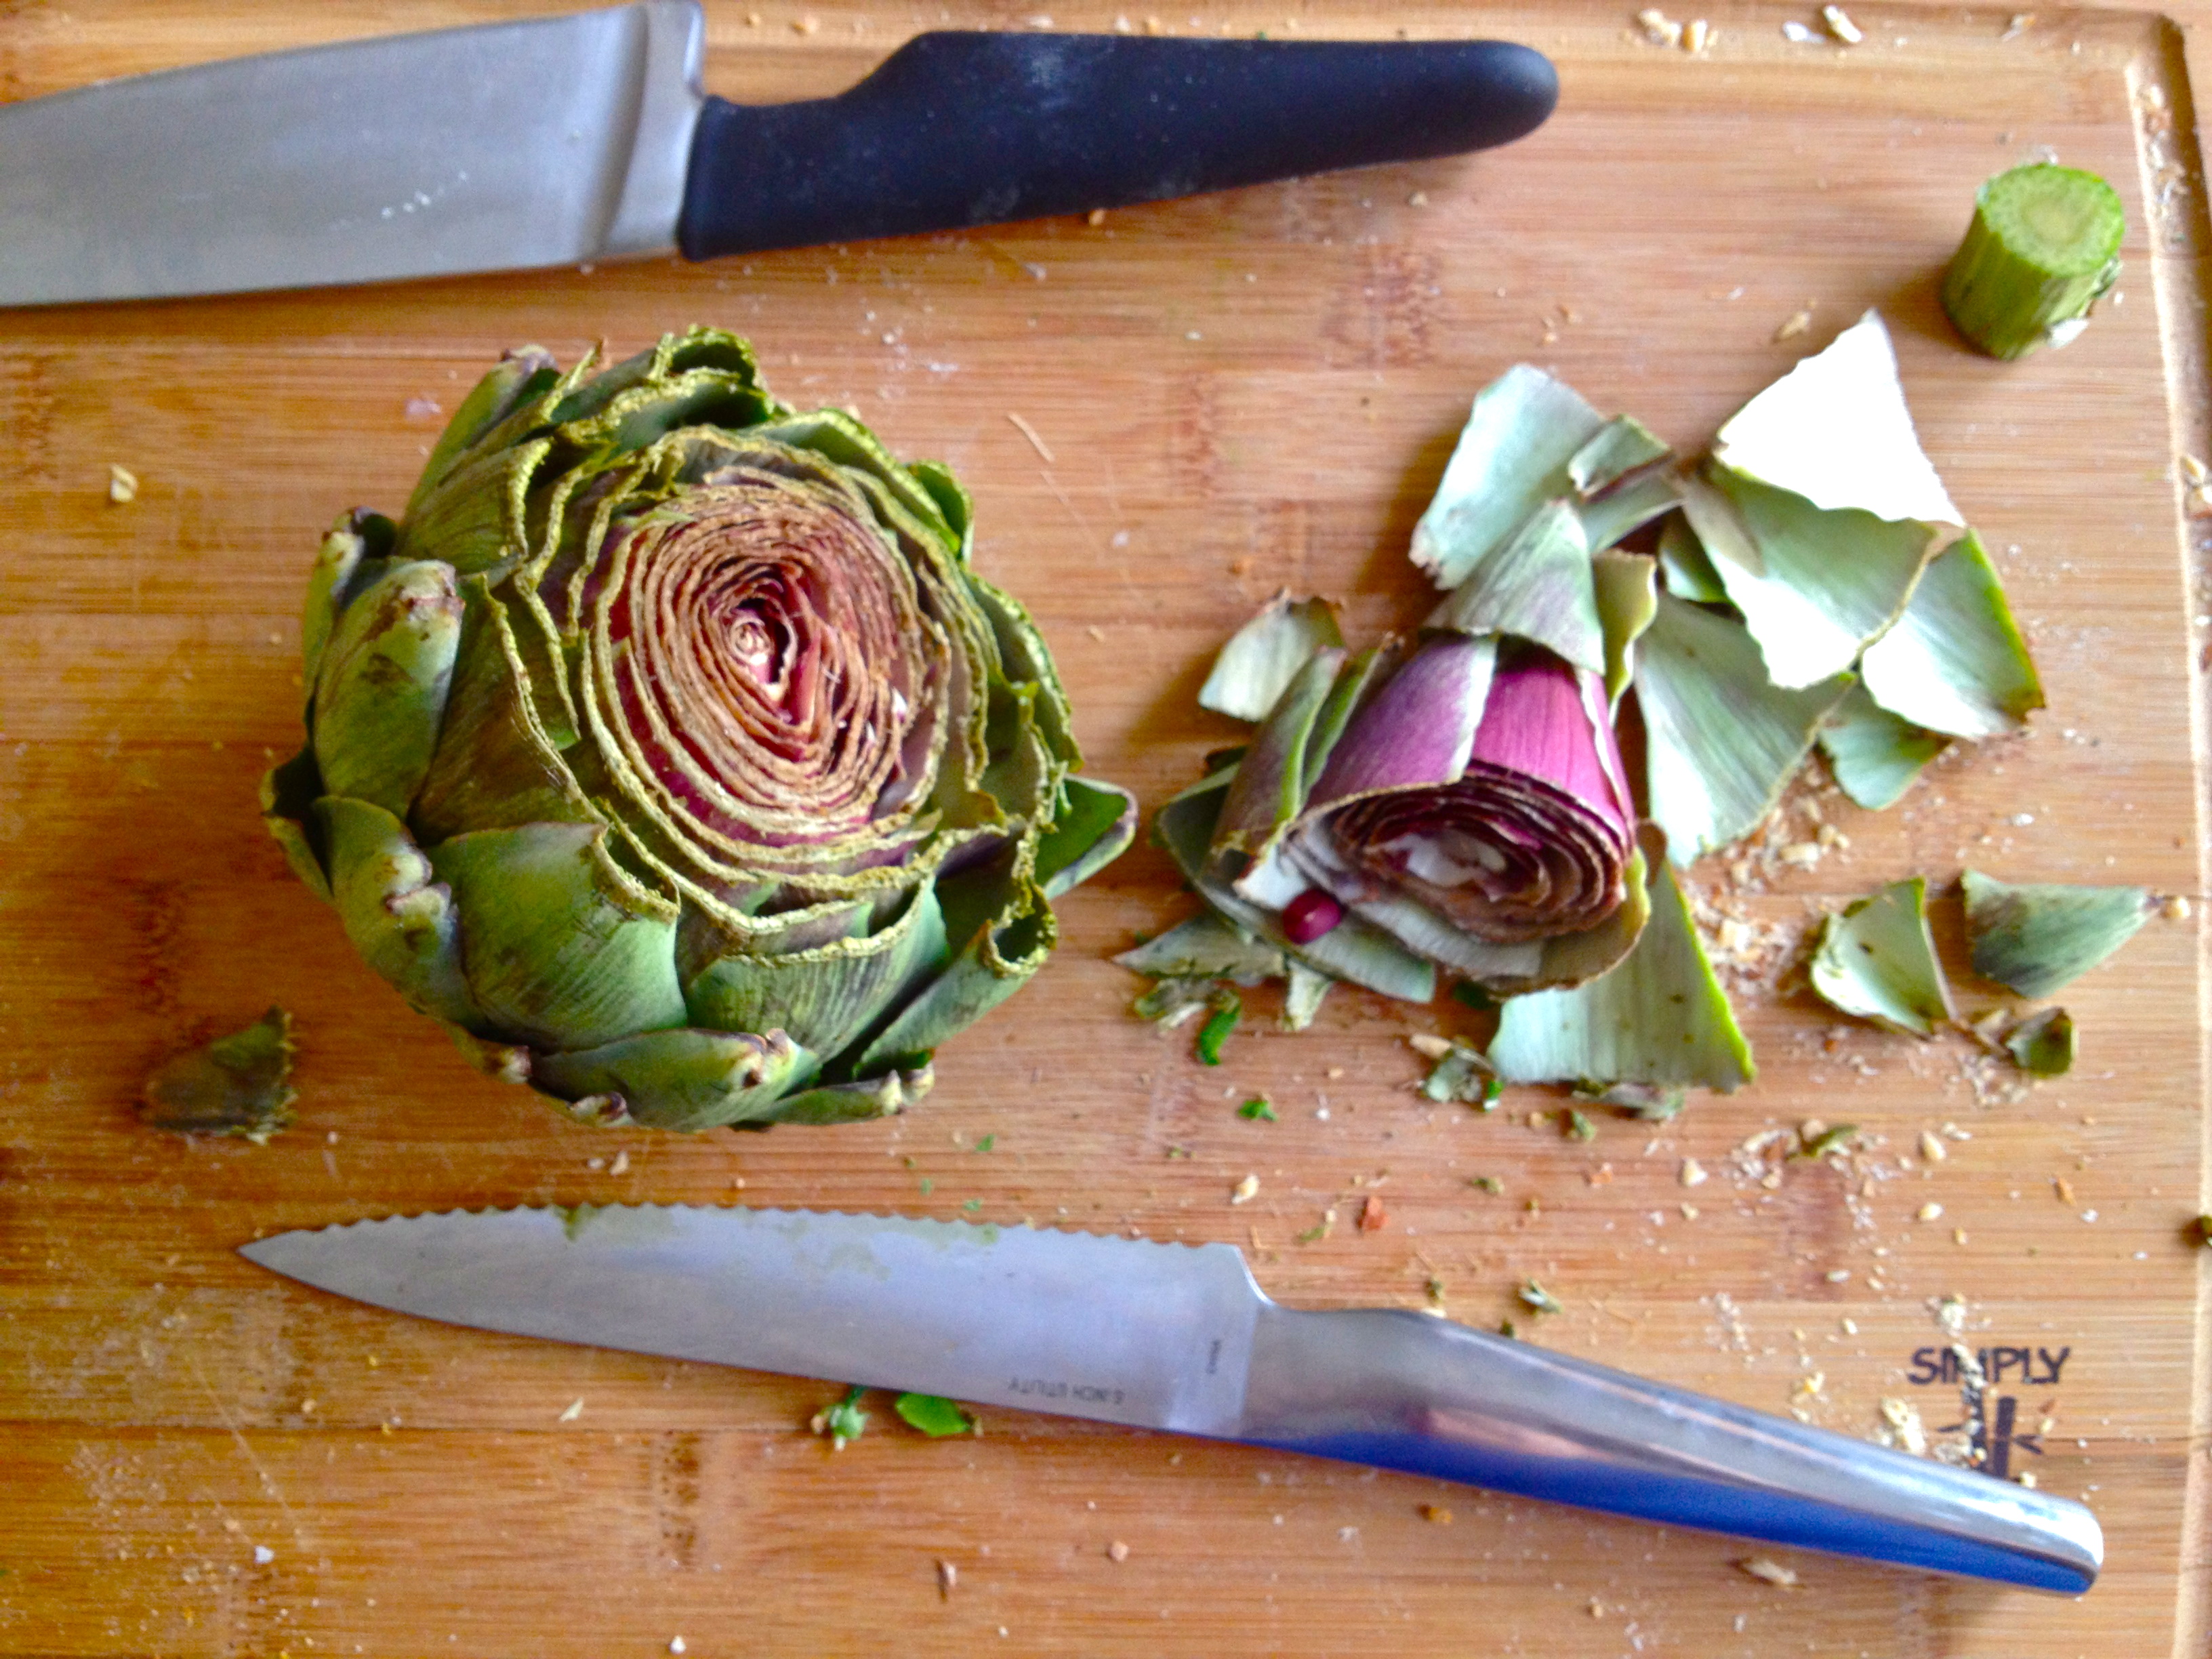
Fill a pot with 1 inch of water, toss in the bay leaf, and set it to boil. Meanwhile, prep the artichoke for steaming. Using a serrated knife, chop the stem most of the way, and cut through the middle of the artichoke so that you trim off the leaf points. Pull the small leaves off the base and discard.

IMG_8130

When the water is boiling, put the artichoke in the pot, wide cute side down and stem up. Cover, turn down to a low boil, and cook 20-30 minutes. It’s done when you can easily pull off smaller leaves at the base near the stem. Remove the artichoke from the water and set is aside to cool down a bit.

To assemble the harissa butter, melt the butter and stir in the harissa.

IMG_8140

When the artichoke has cooled enough to touch, take out the choke. Take your tongs and use them to find the middle section of the artichoke, where the purple-y leaves are. Use the tongs to pull this section out of the artichoke and expose the hairy choke in the center.

IMG_8145

Then trade the tongs for a fork. To remove the hairy center, use the fork to gently loosen the hair from the heart. Pull it away and throw it out. Continue to gently loosen the hair and remove it until the heart is clean and exposed.

IMG_8151

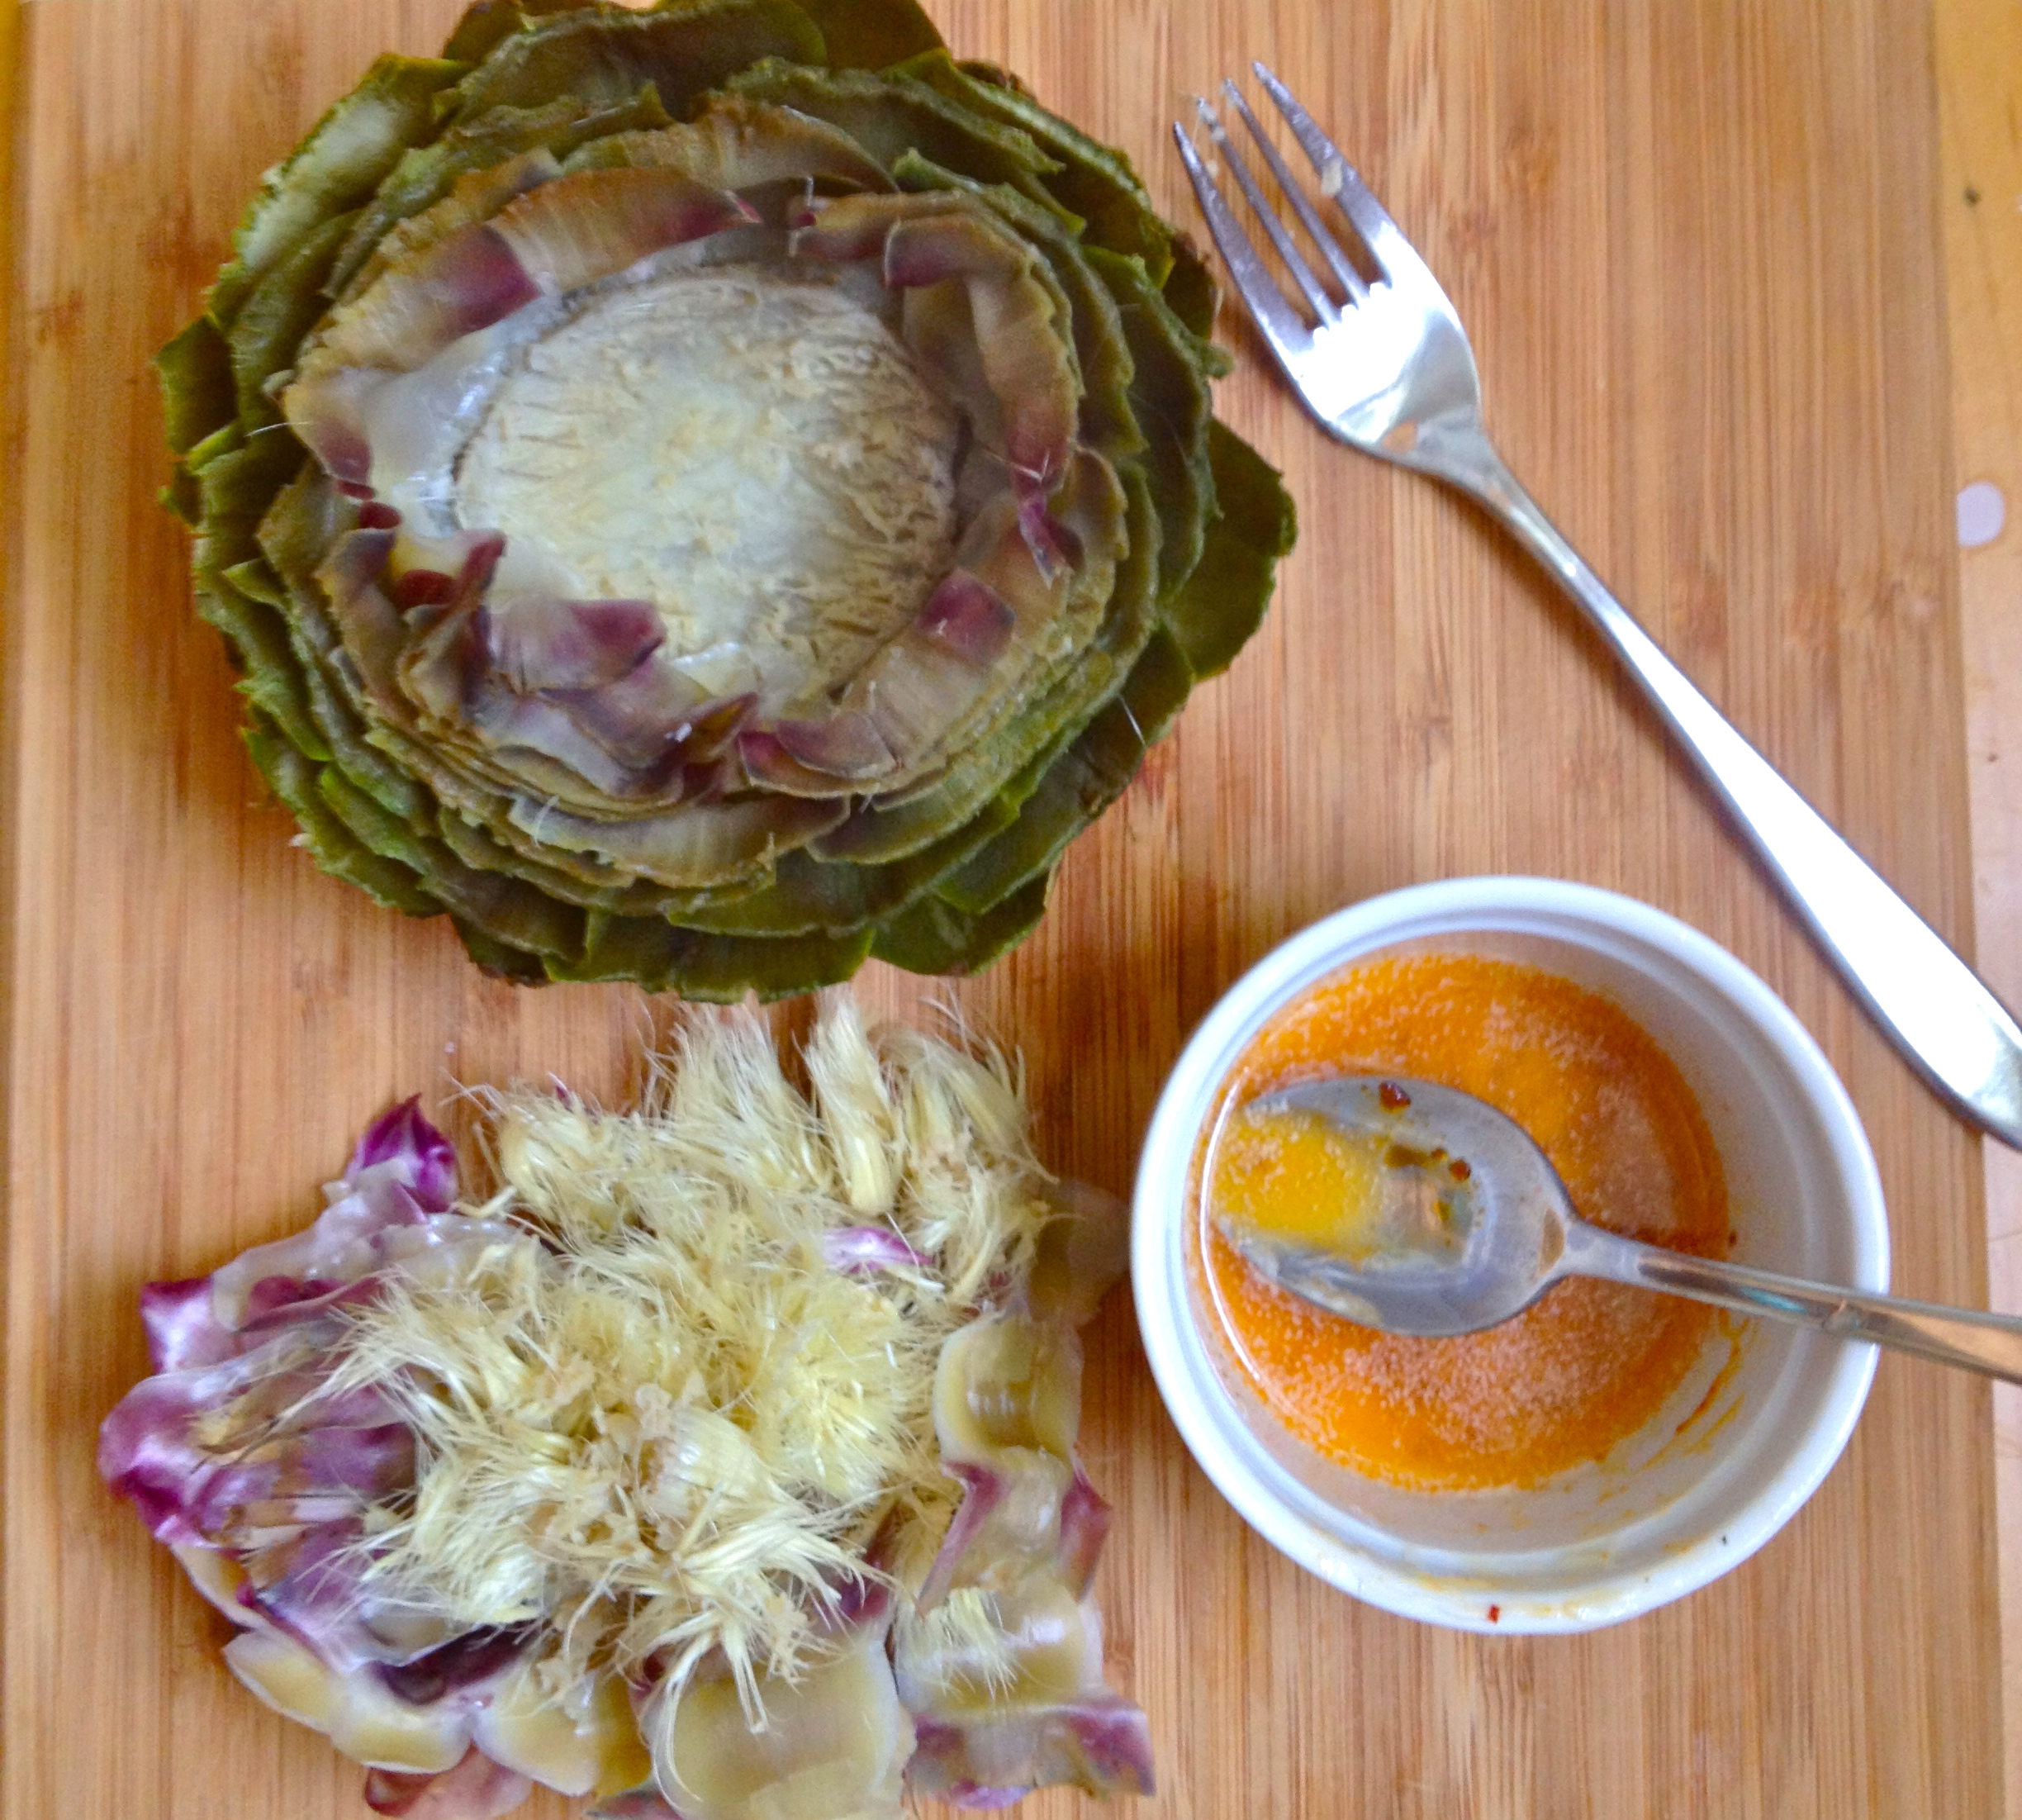
Put your artichoke on a plate and spoon about half of the butter over the center, over the heart. Use the rest for dipping the leaves; I like to dip each leaf and scrape the base for the “meat,” and then eat the heart last. These are so unbelievably good!!

IMG_8165

And thank you, oh culinary pioneer of the past, who discovered the glory of artichokes and made this meal possible.

Advertisement

Stuffed Potato Skins.

Mmmmm. I love when amazing recipes are born of leftovers. What to do with leftover Christmas ham? This is a totally sumptuous and indulgent use of that holiday bounty, and it’s worth it in every way. My stuffed skins are the lovechild of a twice-baked potato and a potato skin, with the best of each coming together in this dish. It’s the steamy meatiness of a twice-baked, with the crispiness and the magical fillings/toppings of potato skins. Make this now or forever regret missing a wonderful food opportunity!

IMG_6339

INGREDIENTS

8 medium baking potatoes, washed
canola oil
1 1/2 cups cheddar cheese, shredded
1 cup Greek yogurt or sour cream
1 tbsp butter
3-5 tbsp milk
2 cloves garlic, minced
1/2 tsp seasoning salt (I used Bridgeport seasoning from the Spice House)
1 1/2 cups ham, diced (great for any holiday’s leftovers!!)
salt and pepper to taste
5 scallions, chopped

Just the Recipe link: Stuffed Potato Skins

DIRECTIONS

Preheat oven to 425 F.

Rub each potato lightly with oil and place on a baking sheet. Bake until fork-tender, about 40 minutes.

IMG_6329

While the potatoes cook, get the toppings/fillings ready. Shred the cheese, dice up the ham, and chop the garlic and scallions.

When the potatoes are done, slice them in half long-ways and use an oven mitt hold them while you scoop out the middles. You want each potato to have enough room to stuff with filling, but enough potato remaining inside so that it still holds its shape. Put the potato meat that you scoop out into a large mixing bowl. Place the empty potato skins back in the pan, drizzle with olive oil, and put back in the oven to crisp up a bit more, about 10-15 minutes (or longer, if you want the skins really nice and crispy. I didn’t have the patience to wait!).

Now, mix up the filling. Stir together the potatoes with the sour cream, milk, butter, garlic, seasoning salt, ham, salt, pepper, and 1 cup of the cheese.

IMG_6331

Take the skins out of the oven and stuff with the filling.

IMG_6333

Sprinkle with the rest of the cheese.

IMG_6334

Bake until the cheese is melted and the skins are even crispier. Sprinkle with scallions. These go great with sour cream and/or ketchup. Enjoy!

IMG_6337

Roasted Brussels Sprouts and Homemade Garlic Mayonnaise.

There are certain recipes that all chefs should know how to prepare. Some are grand and time-consuming, like coq au vin or borsch, and others are simple and versatile, like cream scones or chicken stock. Often these types of recipes are all about getting the technique right, which can be much more difficult than it sounds. I always have a couple of difficult recipes that I’m working on, trying a few times to make sure I’ve got them right before I post anything about them. Luckily for me, homemade mayo was one I got right the first time! It takes a strong arm, a steady hand, and a good eye, but it really isn’t so difficult when you get down to it. A whisk here, a few drops there, followed by a bit of frantic whisking-while-pouring, and you’ve got yourself a beautiful homemade mayonnaise. Crispy golden brown Brussels sprouts are the perfect accompaniment to this garlic mayo, but you’ll definitely have some leftovers on you hands, so go crazy and mayonnaise it up while you’ve got this beautiful fresh stuff around. Chicken salad sandwiches maybe? Or BLTs spread with a generous glob of mayo on perfectly toasted wheat bread? If there ever were a time to be glamorous and indulgent with your food, it’s when you’ve got access to your own homemade mayonnaise.

INGREDIENTS

for Brussels sprouts:
a few handfuls of Brussels sprouts, the smaller ones halved and the larger ones quartered
olive oil
salt and pepper to taste

for mayonnaise:
1 egg yolk, room temperature (raw egg warning blah blah blah)
1 tsp vinegar (I used white vinegar)
3/4 tsp dijon mustard
not quite 1 cup oil (I used a mixture of olive and canola, with a bit more olive than canola)
2 cloves garlic, minced
salt and pepper to taste

DIRECTIONS

Preheat oven to 400 F.

Toss Brussels sprouts with olive oil, salt, and pepper, and spread in a single layer on a foil-lined pan. Bake until slightly crispy and browned.

While the Brussels sprouts cook, mix up the mayo. Whisk together egg yolk, vinegar, and mustard. Whisking constantly, add a few tiny drops of the oil mixture at a time until the mixture emulsifies. Add the rest of the oil in a steady stream until it’s all incorporated into a smooth, pale yellow mayo.


At this point, whisk in the lemon juice, salt, pepper, and garlic.

That’s all! Scoop the mayo into a ramekin and serve it as is, at room temperature, or cool it off in the fridge for a while. Serve as a dip with the hot Brussels sprouts. You’ll have a lot of mayo leftover, so do something amazing with it (it won’t last as long as preservative-y store-bought mayo so use it up quick!).

Baba Ganoush.

I’m no farmer and I don’t know anything about the seasonality of produce. Visiting most American grocery stores, the average shopper would have no idea when various fruits and veggies were in season, because stores sell pretty much everything, all year round. And while it can be nice to have fresh avocados in winter and apples in spring, there’s really nothing as good as in-season local produce, picked by farmers and eaten by me on the very same day! On Saturday morning at the farmers market, I saw more eggplants in more different varieties than I even knew existed, so my keen non-farmer Spidey Sense tells me it must be eggplant season in the midwest. I picked up a nice big one and made this classic Middle Eastern roasted eggplant spread. Go get your own before the season passes!

INGREDIENTS

1 large eggplant
4 cloves garlic, peeled and cut in half
1 tbsp good quality extra virgin olive oil
1 tbsp tahini
2 tsp lemon juice
fresh parsley, chopped
1/8 tsp hot paprika, plus more for dusting
salt and pepper to taste

A successful morning at the farmers market.

DIRECTIONS

Preheat oven to 375 F.

Pierce eggplant 8 times. Place on hot grill or directly on gas stove over medium high flame. Turn so that each side chars evenly.

When the skin is charred, remove from heat.

Stuff garlic cloves into the slits in the eggplant.

Roast on baking sheet for about 20 minutes, until eggplant is completely softened. Set aside to cool.

While eggplant cools, combine all other ingredients in a bowl.

When the eggplant has cooled enough to touch, cut off the stem and peel off as much of the skin as you can.

Cut into three pieces and add to a food processor along with all other ingredients.

Spoon into a bowl and dust with more paprika. I forgot to do it for the photo, but an extra drizzle of olive oil isn’t a bad idea either.

Toasted Pecan Coleslaw.

Happy Fourth of July!! And to all friends in Chicago, Boston, and anywhere else that is brutally, disgustingly hot and humid today, I feel your pain. I think I’ve mentioned before that my apartment doesn’t have air conditioning, but as long as I don’t turn the oven on, it’s actually pretty pleasant. Today I volunteered to make coleslaw for a barbecue, and I was excited to riff on a Nigella Lawson recipe that I saw on one of her shows. One thing I wanted to do was oven-roast some pecans to top off the coleslaw, but on a hot hot hot day like today, even I have enough self-control to stay away from the oven. So instead of an elegant “roasted pecan coleslaw,” I made a much more down-to-earth “pan-toasted pecan coleslaw”—and just as important, my apartment is still livably cool. Besides, it’s Independence Day, and I have the right to prepare my pecans any way I want!

INGREDIENTS

1 head white cabbage, shredded
3 carrots, peeled and grated
3 green onions, white and green parts, sliced thin
1 scant cup olive oil mayo
1 tbsp white vinegar
2 tsp honey
2 tbsp Greek yogurt
dash of hot sauce
salt and pepper to taste
1 1/2 cups unsalted pecans, rough chop

DIRECTIONS

Combine cabbage, carrot, and green onions in a large bowl.

In a separate bowl, stir together mayo, vinegar, honey, yogurt, and hot sauce.

Pour sauce over the cabbage mixture, season with salt and pepper, and toss to coat. Put coleslaw in the fridge until ready to serve.

Heat a large pan over medium flame and add the pecans. As soon as they start to release that beautiful nutty smell, start to watch them carefully, because they’ll burn pretty quickly. When they’ve darkened slightly in color and they smell strong, but not burned, remove them from heat.

Just before you serve, sprinkle the coleslaw with your toasted pecans. Enjoy it on a burger or pulled pork sandwich or eat it with baked beans, then have some apple pie, and watch some fireworks. Happy 4th!

Homemade Pickles.

When I found myself in possession of some cute miniature pickling cucumbers, I wanted to try making pickles in my humble little apartment kitchen. Canning your own food is an art—-and it’s an art I have not mastered. I’d love to get the proper equipment and learn to home-can, but for now, this method will do the trick. The bright cucumbers and spices make for such a pretty jar in your fridge, and they crunch and taste just like store-bought pickles! This recipe will make a jar of garlicy dill pickles with a bit of spice, and while they won’t last as long as the properly-canned kind, they’ll keep in your fridge for about 3-4 weeks of crunchy pickle goodness.

INGREDIENTS

6 pickling cucumbers, cut into whatever shape you want (I cut them into spears)
3/4 cups distilled white vinegar
1 1/2 tbsp salt
1 tbsp sugar
1 cup cold water
pinch of ground coriander
pinch of turmeric
1/4 tsp dried dill
2 cloves garlic, peeled and crushed
1/2 tsp mustard seeds
1/4 tsp red pepper flakes

DIRECTIONS

In a stainless steel or teflon pot over medium heat, whisk together vinegar, salt, and sugar until dissolved. Pour into a bowl and whisk in cold water. Refrigerate the brine until chilled.

Fill a clean jar (I used an old salsa jar and they fit perfectly) with cucumbers. Sprinkle the flavorings around the jar and then pour in the brine.

Refrigerate at least 24 hours before you dig in. Try your pickles on a Chicago dog or with a buffalo chicken grilled cheese!