Hearty Farro and Lentil Vegetable Soup.

Welcome to this recipe. Here’s some hot hot info on cooking with parmesan rind.

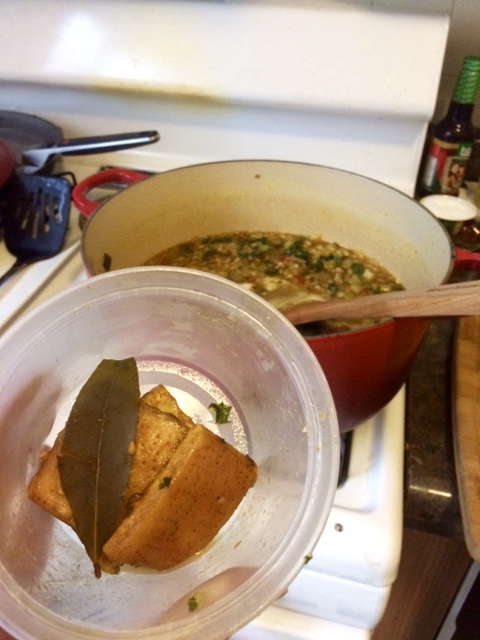
If you buy parmesan cheese “the old-fashioned way,” a.k.a. you buy a real hunk of cheese and not the pre-shredded or grated stuff, you MUST start saving the rinds in the freezer. I keep a little plastic bag in the door of my freezer for them, because they’re an amazing ingredient. Cheese rind has all the same flavor as the cheese itself, so when I’m making a soup or a sauce, I throw in one (or three) bits of parmesan rind during the simmer stage and let all that parmesan-ness permeate into the dish while it cooks. It’s an amazing flavor trick AND it recycles something you would have otherwise thrown away. And given the beautiful plant-based nature of this soup, you might as well offset a bit of the damage your cheese (i.e. a cattle product) ingredient inflicts on the earth by recycling part of it!

Hearty Farro and Lentil Soup with Turmeric, Parmesan, and Kale | Kelly in the Kitchen | Ingredients: butter or olive oil, onion, zucchini, garlic, tomatoes, turmeric, cumin, salt and pepper, stock or broth, bay leaf, farro, lentils, kale, parmesan rind (optional)

INGREDIENTS

butter or olive oil
1 large onion, diced
1 large zucchini, diced
2-3 cloves garlic, minced
2-3 tomatoes, seeded and diced
1 3/4 tsp ground turmeric
3/4 tsp cumin
salt and pepper to taste
8-ish cups stock or broth (honestly guys I almost never measure stock, so just eyeball it. Also, I use homemade chicken stock, but vegetable stock will do the trick if you want to keep this vegetarian/vegan)
1 bay leaf
1 cup farro, rinsed
1 cup lentils, picked clean and rinsed
optional: parmesan rind (obvi this is not vegan so feel free to leave out. Or, if you love the flavor of parmesan as much as I do, add as much rind as you want)
1 heaping cup kale, washed, stems removed, chopped
good quality olive oil

DIRECTIONS

In a large stock pot, heat butter or olive oil over medium low and add onion, zucchini, and garlic. Cook until starting to soften, about 2-3 minutes. Stir in tomatoes and cook until veggies start to soften.

Add turmeric, cumin, salt, and pepper, and stir. Cook about 2 minutes until the spices are fragrant. Stir in the stock and bay leaf and bring to a boil. Once boiling, add farro and lentils. Bring back to a boil, turn down to a simmer, and partially cover the pot. Simmer, stirring occasionally, until the lentils are just tender and the farro is cooked but still chewy. Add the kale and cook just until softened, only a few minutes. Turn off the heat. Remove bay leaf and fish out the melted parmesan rind bits.

Hearty Farro and Lentil Soup with Turmeric, Parmesan, and Kale | Kelly in the Kitchen | Ingredients: butter or olive oil, onion, zucchini, garlic, tomatoes, turmeric, cumin, salt and pepper, stock or broth, bay leaf, farro, lentils, kale, parmesan rind (optional)

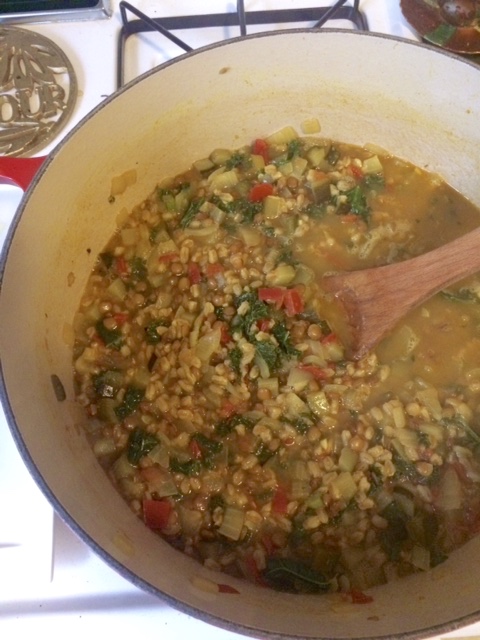
Mandatory: serve with a drizzle of good quality olive oil. Actually, “drizzle” is far too dainty a word for the amount of olive oil I add when I eat this soup. Some kind of magic happens when all those flavors get together. Enjoy.

Hearty Farro and Lentil Soup with Turmeric, Parmesan, and Kale | Kelly in the Kitchen | Ingredients: butter or olive oil, onion, zucchini, garlic, tomatoes, turmeric, cumin, salt and pepper, stock or broth, bay leaf, farro, lentils, kale, parmesan rind (optional)

Advertisement

Chickpea Flatbread.

I’ve become obsessed with these chickpea flatbreads. Lately I’ve been making them every week, because they go with everything and are so good. They’re the basis of a breakfast tostada-like thing I make on weekends, a great addition to a curry chicken and cauliflower rice work lunch, and I’ve even tried to make them into a quesadilla for dinner (with mixed results). They’re also very forgiving–it’s tough to overcook them–and have so few ingredients, I can barely call this a recipe. But a recipe it is, and such a versatile one. Chickpea flatbreads are quickly becoming one of my go-tos and I’m not mad about it.

IMG_8200

INGREDIENTS

2 cups chickpea flour
3 cups cold water
olive oil
salt and pepper

DIRECTIONS

Pour the chickpea flour into a mixing bowl, and slowly whisk in the cold water, stirring to break up any lumps. Once you’ve added all the water and the batter is completely combined, use a slotted spoon to skim off any foam that has risen to the top. Get rid of that foam! Your digestive system will thank you later. Set the de-foamed batter aside on the counter to soak overnight (or for at least 6 hours).
A note on soaking: I’ve made the flatbreads after waiting only 3 hours, and while they still turn out delicious, they are also a lot harder on your digestive system (remember that rhyme about beans?). So I soak the batter overnight at a minimum.

IMG_8161

Once the batter has soaked, use a slotted spoon again to skim off any foam/impurities that rise to the top. Then give the batter a good stir to make sure it’s well-combined, and you’re ready to make some flatbreads!

Heat a crepe pan or other non-stick surface over a low flame (2 out of 10 on my stove) and add a good amount of olive oil to the pan – not so much that you completely cover the bottom of the pan, but more than you’d use to just grease it. The olive oil is a fantastic flavor in this recipe, so you really do want to taste it.

Once the pan is hot, you’re ready to add your batter. The amount you add will depend on the size of your pan: I use about 1 cup of batter, which covers the entire pan so that you can’t see the bottom–thicker than a crepe. Pour it in, add salt and pepper to taste, and let cook undisturbed for about 10 minutes. Once the batter is set on top, turn up the heat to medium/medium low (4-5 out of 10 on my stove) for 2 minutes to brown the bottom.

IMG_8193

Flip the flatbread over and cook the other side for another 8 minutes or so, until both sides are browned and the flatbread is cooked through.

That’s it! I prefer to serve these right away, with some melted cheese, salsa, and eggs. Or you can let them cool, cut them up into quarters, and serve later. These heat up fine in the microwave, but they’re best reheated on a skillet. Usually I make one at a time, and I keep the rest of the batter in the fridge to make later (up to a week after first mixing it).

IMG_8197

Raspberry Chocolate Chunk Sorbet.

Raaaaaspberry sorbet. The kind you find in a secondhand store. For me, raspberries are about as good as berries get. I rank them at the very berry top, the pinnacle of berry perfection. So, of course, my first use of my ice cream maker this season had to be raspberry. Their vibrant fruity flavor is the star here, and they’re so sweet on their own that this recipe doesn’t need much added sugar. Which is exactly how I like it. I mean, if you add minimal sugar, that gives you free rein to add all the chocolate chunks you want!

Raspberry Chocolate Chunk Sorbet | KellyintheKitchen| Ingredients: water, sugar, raspberries, lemon juice, vanilla extract, chocolate

INGREDIENTS

2 cups water
3/4 cup granulated sugar (or substitute half a cup agave nectar if you want to skip a step, see below)
1 lb. (about 4 cups) raspberries (I used fresh, but frozen will work, too)
1 1/2 tbsp lemon juice
1 tsp vanilla extract
3/4 cup chocolate, chopped (I used milk chocolate chips. Dark chocolate would also be a great decision.)

DIRECTIONS

If you’re using sugar and not agave nectar, start by combining the water and sugar in a saucepan over high heat. Bring to a boil, then turn down and simmer for 5 minutes. In a food processor or blender, blitz the raspberries, lemon juice, and vanilla. Pour mixture through a mesh strainer into a large bowl. Stir in the sugar syrup or the agave nctar and refrigerate at least 30 minutes (the longer the better).

IMG_5348

When the mixture has cooled, churn it according to your ice cream maker’s instructions. I didn’t actually keep track of how long I churned the sorbet for – it was less than one full episode of LOST…around 25 minutes, probably.

IMG_5360

When the sorbet is thick and churned, it will have a “soft serve” consistency. Pour it into the container you’ll be freezing it in, and stir in the chocolate chunks. Freeze a few hours or overnight.

IMG_5362

When your sorbet is set and frozen, it’s ready to go! Scoop it into pretty cups and tell yourself “This is fruit, it’s fine to have seconds.”

Raspberry Chocolate Chunk Sorbet | KellyintheKitchen| Ingredients: water, sugar, raspberries, lemon juice, vanilla extract, chocolate

Nutty Cinnamon Cream of No-Wheat, a.k.a. “Faux-tmeal”

Cream of No-Wheat: a hot cereal made with nuts, dried fruit, seeds, and cinnamon – but with no wheat and no oats. Considering how I’ve altered the way I eat pretty dramatically over the past few months, moving away from processed grains and sugar and toward protein, fruits, veggies, and the like, this recipe is the answer to my breakfast dreams! That’s because, while I really haven’t looked back following these big changes, I have to admit that there are a few things I have truly, truly missed, and one of those things is my morning oatmeal.  When I saw a recipe from A Girl Worth Saving via salixisme that looked like a great hot cereal compromise, I had to give it a try. And it is absolutely delicious: creamy, nutty, with just enough sweetness from the dates, and a slightly chewier consistency from the nuts and seeds. It’s a very flexible recipe, and you can swap various ingredients in or out as you like: pumpkin seeds, wheat germ, pecans, dried apples, or brown sugar would all do a little something special if you wanted to try them out in here. And because this recipe makes about 8 servings, you can prep the “oatmeal” dry mix ahead of time, and just cook however many servings you need that morning. I calculated it out, just to see what this dish looks like from a protein perspective: each 3/4 cup serving has about 8g of protein, plus about 10g from the milk, making this a breakfast with about 18g of protein. Yay for hot breakfast!

UPDATE: I recently made another version of this – I was out of sunflower seeds, so instead of the 1/2 cup of sunflower seeds, I used about 3 tbsp of chia seeds and an additional 1/4 cup of chopped walnuts. The chia seeds were awesome here, thickening the consistency to that it more closely resembled cream of wheat. I’m definitely adding chia seeds to this every time I make it from now on!

IMG_9564

INGREDIENTS:

the dry mix*:
1/2 cup roasted sunflower seeds, chopped
1/2 cup flaxseed meal (or use whole flax seeds and grind them)
1/2 cup walnuts, chopped
1/2 cup almonds, slivered
1/2 lb pitted dates, chopped
1/2 tsp salt
1/2 tsp ground cinnamon
1/2 tsp vanilla extract
*NOTE: chop your ingredients finer if you want a smoother, more cream-of-wheat-esque finished product, or leave them bigger for a chunkier consistency. I tried to opt for a middle ground.

to cook the oatmeal:
3/4 cups of dry mix per person
1 1/4 cup milk per person (dairy milk, almond milk, whatever you like)

Just the Recipe link: Nutty Cinnamon Cream of No-Wheat, a.k.a. “Faux-tmeal”

DIRECTIONS

Combine all the dry mix ingredients in a bowl and stir together.

IMG_9553

Measure out the amount you’d like to make now (about 3/4 cups per person should do it), and store the rest in an air-tight container in the fridge, for future use.

IMG_9554

To cook the oatmeal, bring the milk to a gentle bubble on the stove and stir in the dry mix.

IMG_9558

Stirring occasionally, simmer gently until thickened to your liking (mine took about 10 minutes, give or take). Remove from heat.

IMG_9560

Spoon the good stuff into a bowl and stir in any extras you like – more milk, fruit, nuts, whatever! Then dig in.

IMG_9563

Roasted Spiced Chickpeas.

Lately at work, I’ve been hanging around a lot of talk about snack foods. Normally I’m not really much of a snacker; I never buy chips or pretzels or anything like that, because I generally don’t crave them. But for the past week, I’ve been taking a lot of notes about people’s snacking habits, and as a result, I found myself really craving salty snack foods. This led me to two thoughts: 1) I have a reaffirmed belief in the power of advertising to get people interested in products they never would have cared about before (i.e., me craving snack foods), and 2) I wanted to give these roasted chickpeas a go, after having seen them on a handful of blogs over the past month or so. Roasted chickpeas make a fantastic replacement for chips. They’re crunchy, salty, spicy, and come in any flavor you can make. So make some!

IMG_6710

INGREDIENTS

1 can chickpeas
olive oil
salt
extra virgin olive oil
seasonings of your choice (I used Ukrainian Village Seasoning from the Spice House)

Just the Recipe link: Roasted Spiced Chickpeas

DIRECTIONS

Preheat oven to 350 F.

The chickpeas require quite a bit of prep: Drain them. Rinse them off. Remove the skin from each little bean, pretending you’re a rabbi conducting a hundred brises. Lay them out on a towel and gently pat them dry. In a bowl, toss them with a drizzle of olive oil and a good sprinkling of salt.

IMG_6701

Lay the salted, oiled chickpeas out on a baking sheet.

IMG_6705

Bake about 50 minutes, until they’re crunchy and browned.

IMG_6708

Now, the seasoning part. There are so many flavor combos that I want to try! Paprika and cumin, parsley and granulated garlic, honey and cayenne pepper, and good old salt and pepper – all yummy pairings. For this batch, I used one of the Spice House‘s awesome Chicago neighborhoods spice blends – the Ukrainian Village seasoning – which has a great blend of onion and pepper flavors. I topped it off with a little sprinkle of truffle salt, just because I was feelin’ fancy.

IMG_6709

That’s it! I love these. They’re a great, substantial snack to munch on when you need a crunch but don’t want to go the chips or nuts route. Enjoy! And be sure to let them cool completely before you put them in any kind of container, or else the heat/condensation will make the chickpeas soggy.

Blackened Onion and Lentil Pilaf.

On Wednesday night, I got home late from a busy day at work, and I was starving! Thinking to make something easy and quick, I decided to put together a really simple lentil dish to accompany the chicken drumsticks I was roasting. I love lentils and consider them an almost-perfect food. They taste good, they’re really versatile, they’re easy to cook, they’re good for you, they last forever, and they’re incredibly cheap! What’s not to love? Last night, I riffed on a Lebanese rice dish called mdardara, which I had learned about a long time ago but hadn’t ever made. It’s a really simple lentil and rice pilaf topped with blackened onion strings, but in my version, I replace the rice with quinoa and the regular brown lentils with the slightly fancier French lentils. What makes this dish so great is that you can really use any kind of lentil, any kind of onion, and any kind of grain that you have around the house. It’s so flexible – just use what you’ve got and you’ll be good to go with a tasty side or main dish that’s totally simple and healthy.

IMG_6457

INGREDIENTS

1/2 cup French lentils
2 cups stock or water (I used homemade vegetable stock)
bay leaf
1/2 onion, sliced
olive oil
salt and pepper
1/3 cup red quinoa (really this will work with any grain)

Just the Recipe link: Blackened Onion and Lentil Pilaf

DIRECTIONS

Add lentils, 1 1/2 cups stock or water, and bay leaf to a pan and bring to a boil.

IMG_6447

Reduce to a simmer and cook until lentils are tender, about 30-40 minutes. Remove the bay leaf, drain any excess liquid, season with salt and pepper, and set aside.

Meanwhile, heat olive oil in a frying pan and add the onions. Cook over medium low, stirring occasionally. When they start to take on a slightly blackened color, add a shallow layer of stock or water to the pan, to help them soften and brown rather than dry up and turn black. If you want them on the more charred side, use less stock; if you like them totally browned and almost caramelized, as I do, use a bit more stock.

IMG_6450

Turn the fire down to low and cook the onions until they’re a deep brown-black and the liquid is almost totally reduced.

Finally, the quinoa. Cook according to package directions. I recommend cooking the quinoa in any remaining stock you have on hand, as this really perks up the flavor of quinoa and makes it way more flavorful than when it’s cooked with water.

When everything is cooked, assemble! Mix the lentils and quinoa and make sure to season with salt and pepper. Spoon them into your bowl or serving dish and top with the onion strings. Add another sprinkle of salt to the onions and that’s it! A simple and easy yet very yummy after work meal that functions as a side or a main dish. And I’m saving the leftovers for lunch.

IMG_6455