Mini Cheesecake Cupcakes.

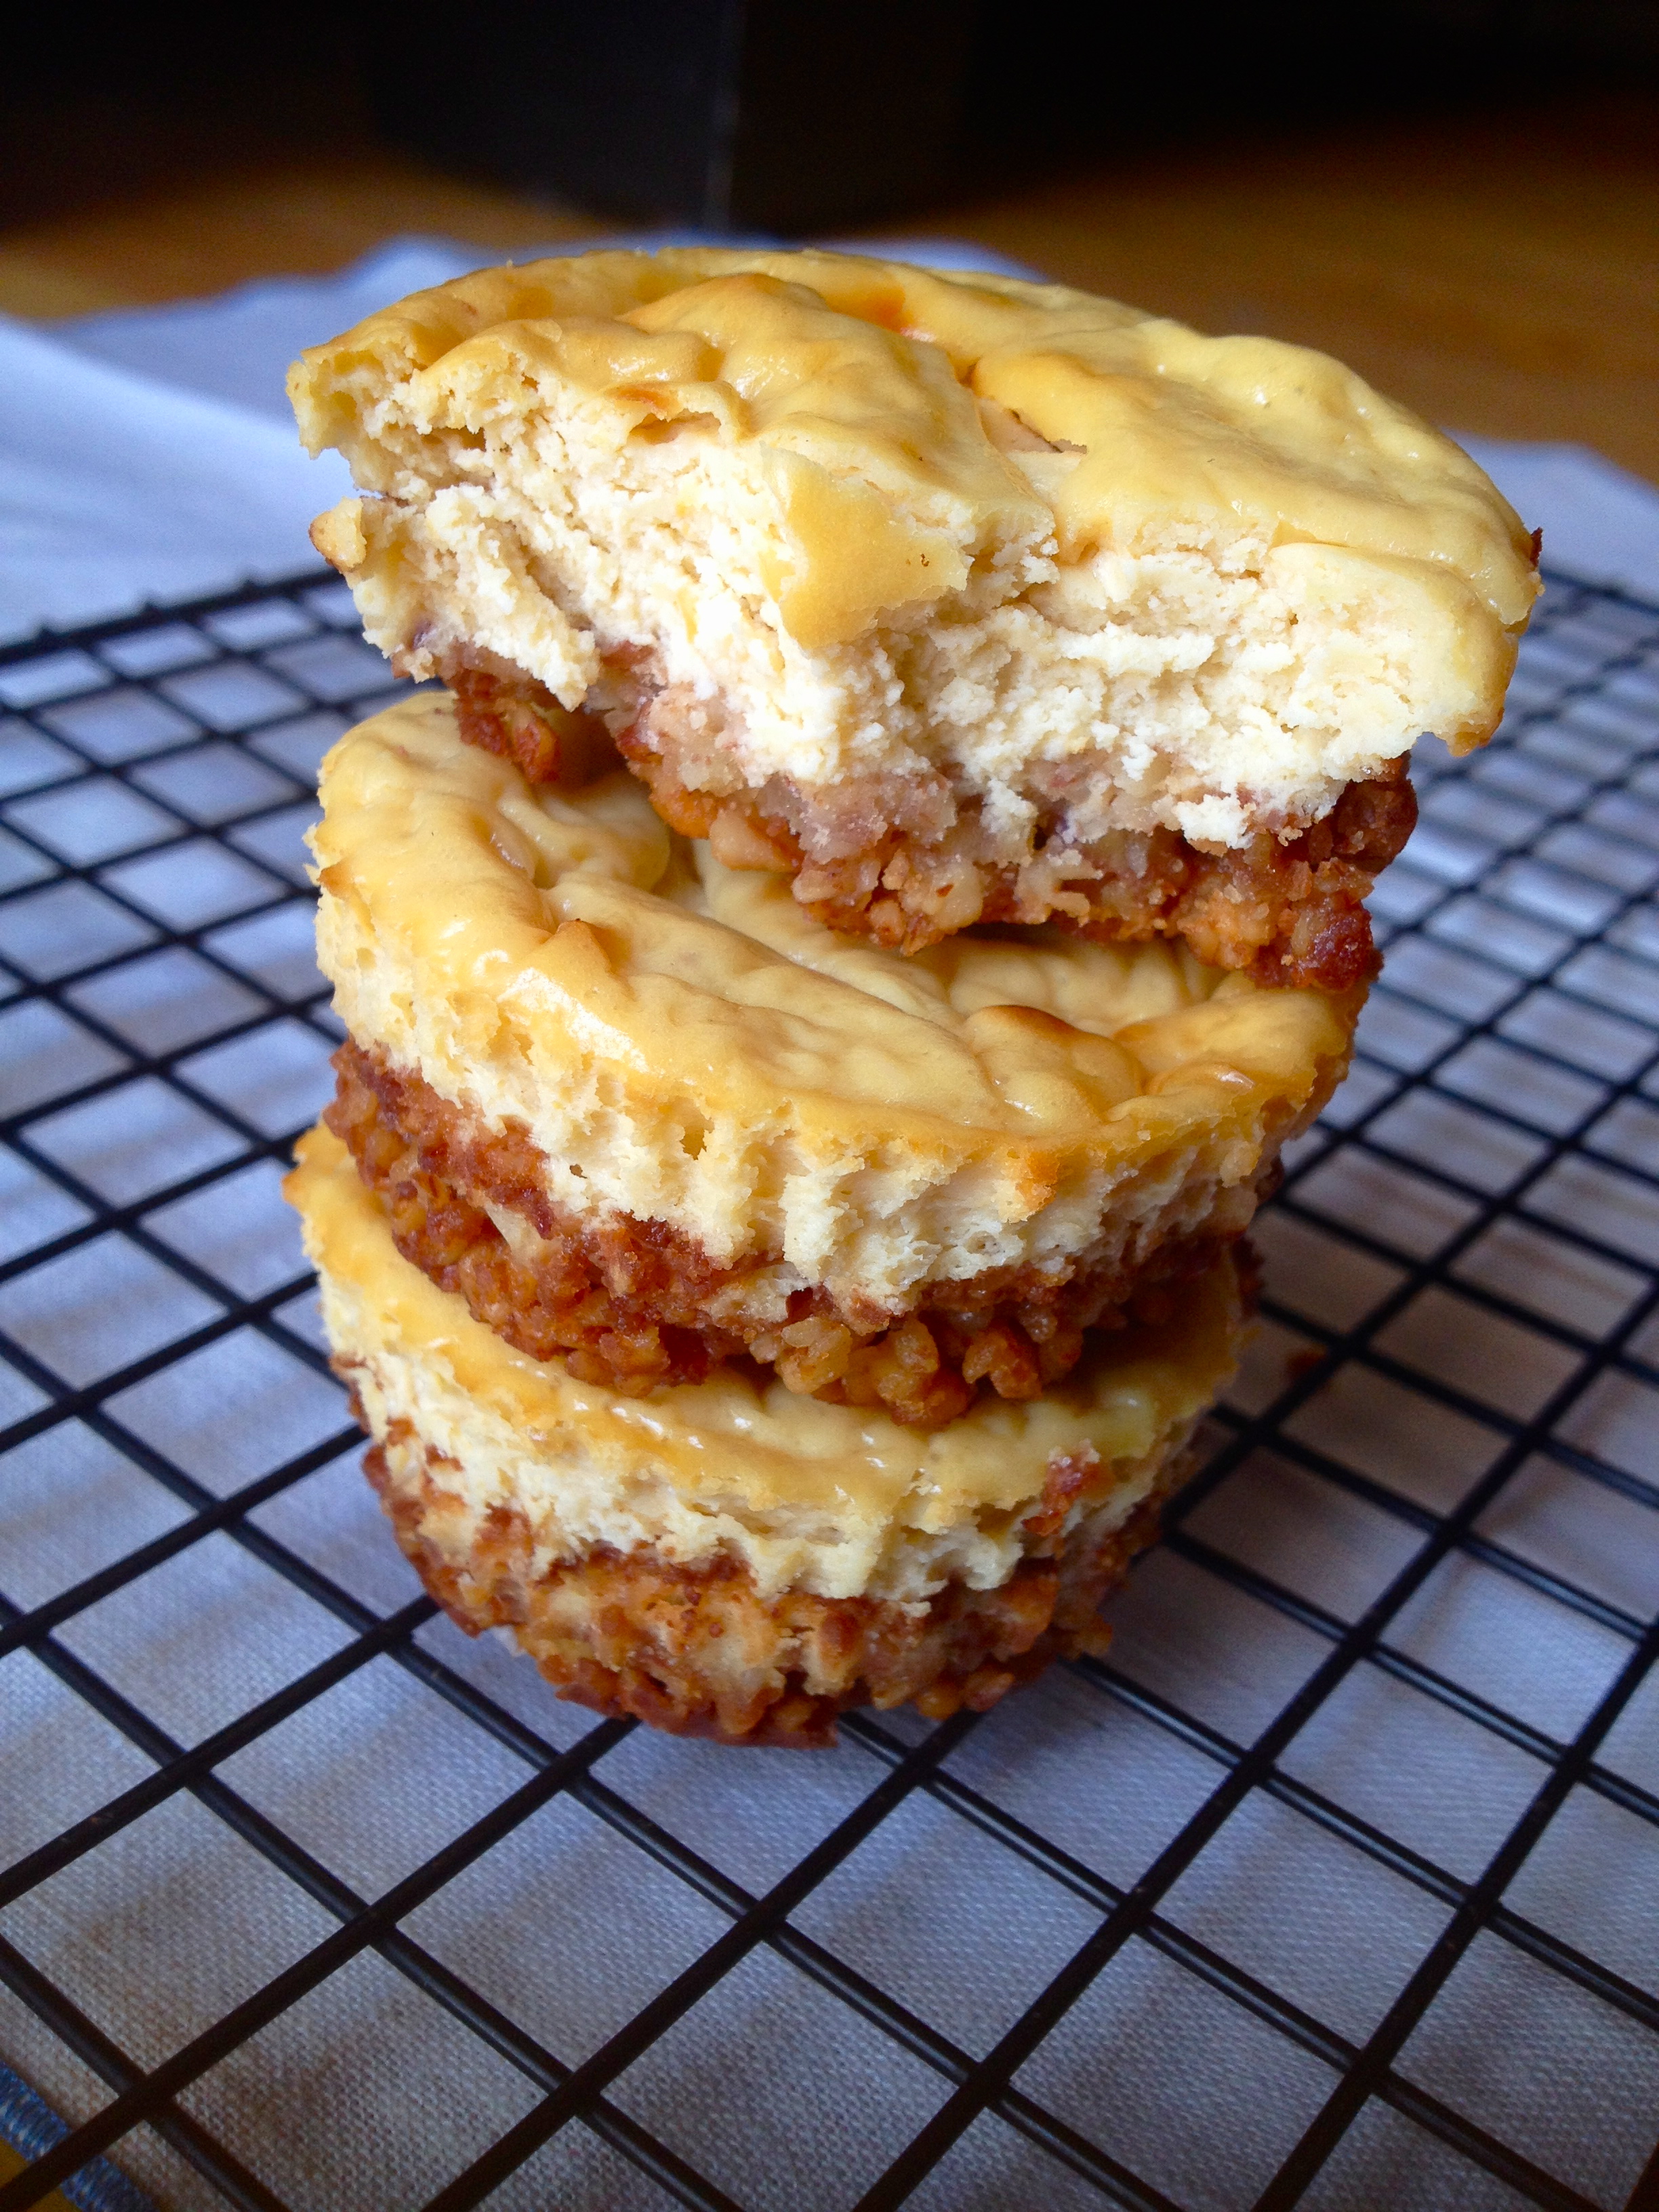
I’ve been doing some experimentation with healthier crusts for the desserts in my life. My main criteria are that the recipe must taste amazing, be low in carbs and sugars, and be free of any processed ingredients. Ground almonds really fit the bill; when combined with butter, they hold the crust together very well, can be flavored however you like, and don’t need much in the way of sweetening. And while nobody loves a good graham cracker crust more than I do, I’ve found that this buttery almond crust rocks in its own right. Filled with creamy, tangy cheesecake awesomeness that has just a hint of coffee flavor, I think I need to start stockpiling cream cheese so I can make these whenever I want. Score another one for the low-impact dessert category!

IMG_1123

INGREDIENTS

1/2 cup almonds, ground to powder in the food processor (or use a scant cup of almond meal)
6 tbsp butter, room temperature
1-2 tsp honey, to taste
12 oz cream cheese, room temperature (if it’s cold, it won’t mix smoothly)
1 tsp vanilla extract
1 1/2 tsp coffee (this is a very subtle flavor here. But if coffee’s not your thing, you could substitute with Kahlua, Bailey’s, or any other peppy flavoring you like… or a little bit more vanilla)
2-3 tbsp honey, to taste
2 eggs

DIRECTIONS

Preheat oven to 350 F. Line a cupcake pan with paper liners. Set aside.

In a small bowl, mix together ground almonds, butter, and honey. Spoon mixture into bottom of cupcake liners and bake for about 8 minutes. You may see little bubbles in the crust as some of the liquid evaporates – this is fine. When the crust smells nutty and good and is starting to brown and set, remove the pan from the oven and set aside while you make the filling.

IMG_1108

To make the filling, use a fork to break up the cream cheese and make sure it’s totally smooth and creamy. Stir in the vanilla, coffee, & honey, and taste. Add more honey if you want it sweeter. Then add one egg and stir until combined before repeating with the second egg.

Spoon filling into cups, and fill as high as you like – these don’t rise as they cook, so need to worry about expansion or overflow. Bake for 12-18 minutes, until the tops are just barely set and starting to take on a golden color.

Let the baked cheesecakes cool in their pan for 2 minutes before taking them out. Then move them to the fridge for at least 2 hours (overnight is best, but that’s asking a lot of your self-control!). They taste good at any temperature, but if not given their proper cooling time, the crust won’t hold together as well and the cheesecake filling won’t be as satisfyingly creamy.

IMG_1127

I considered melting a bit of chocolate or topping with a raspberry or in some way dressing ’em up, but they really can stand on their own as a yummy dessert you can feel good about eating.

Chicken, White Bean, and Brussels Sprouts Salad.

Here’s a quick and simple dinner recipe that I love to make on weeknights (you can tell from the poor lighting in my photos that I really do make this on work nights!). Shredded Brussels sprouts salads are so popular right now, but for me, they’re only really special when they check a few specific boxes: the dressing needs to have a creaminess factor, supplied by a bit of mayo here. The tart-sweet balance has to be just right – so I’ve paired apple cider vinegar with honey. And though I hate to say it, the protein must come from something other than bacon (as is so often the case with Brussels sprouts salads). This is a dinner salad, not a side salad, so the beans and chicken are essential and so so good. Here’s how you know this is an awesome dish: I always make twice as much as I’ll need, so that I can bring the leftovers to work for lunch the next day. But once or twice I have eaten the whole thing and had to think of something else to bring for lunch. What can I say…it’s healthy and tastes fantastic!

IMG_0831

INGREDIENTS

1 1/2 tbsp mayo
3 tbsp extra virgin olive oil
1/4 tsp garlic powder
1/4 tsp parsley
pinch of cayenne pepper (or a squeeze of hot sauce)
1/4 tsp Dijon mustard
1 tbsp apple cider vinegar
1 tsp honey
salt and pepper to taste
2 chicken breasts, cooked and shredded
3 cups shredded Brussels sprouts
1/2 cup canned white beans, drained and rinsed (I used great northern beans)
2-3 tbsp chopped roasted almonds

DIRECTIONS

In a small bowl, stir together mayo, olive oil, garlic powder, cayenne pepper, parsley, mustard, vinegar, honey, salt, and pepper.

In a larger bowl, toss Brussels sprouts, beans, chicken, and almonds with dressing. C’est tout!

IMG_0828

Creamy Chocolate-Coffee Tart with an Almond Crust.

Yogurt is good. Chocolate is good. Coffee is good. Almonds are good. Chocolate is really good. So naturally, this recipe is good. The buttery almond crust is like the delicious nutty cousin of your standard graham cracker crust, but it’s much easier on us carb-avoiders and any gluten-free peeps among us. And the creamy chocolate-coffee filling is just sweet and decadent enough, without going sugar-overboard. It’s a quick and easy road to creamy nutty goodness. I like to give it a sprinkling of chocolate chips, but it would be pretty groovy to drizzle some melted chocolate over the top and really up that glamor factor.

NOTE: This isn’t a good dessert to make far in advance. It will last in the fridge about 36 hours before the yogurt starts to dry out from air exposure. The good news is, it doesn’t take long to make, but if you need to do some prep ahead of time, make and bake the crust and keep it in the fridge. Then, a few hours before you’ll need it, mix up the filling and assemble the tart.

IMG_0742

INGREDIENTS

for crust:
4 tbsp butter, melted
1 tbsp honey
1 1/2 cups almond meal
1/2 tsp salt
1/2 tsp cinnamon

for filling:
1 1/2 cups Greek yogurt (I use Fage because it’s SUBLIME)
2 1/2 tbsp cocoa powder
1 tsp instant coffee granules (not coffee grounds!)
2 tbsp hot water (the point of the hot water plus instant coffee granules is to get 2 tbsp coffee, so if you want, skip the granules and hot water step and just use 2 tbsp coffee)
2 tbsp brown sugar
chocolate chips

DIRECTIONS

Preheat oven to 350 F.

Stir honey into melted butter. In a mixing bowl, combine butter and honey with almonds, salt, and cinnamon. Press into a tart shell or pie dish. Bake for 15-20 minutes, until it’s a medium brown color. I would tell you to wait for it to be “golden brown,” but it’s pretty much golden brown before it even starts cooking. If it starts to brown too quickly (mine did), tent the crust with tinfoil to protect it from burning. When the crust is done, remove it from the oven and let it cool at least half an hour.

While the crust cools, prepare the filling. Dissolve the coffee granules in the hot water. Stir together the Greek yogurt, coffee, cocoa powder, and brown sugar. Keep it in the fridge until the crust has cooled.

IMG_0738

Once the crust is cooled, spread the yogurt filling evenly over it. Sprinkle with chocolate chips and dig in!

IMG_0745

Irish Coffee Toffee.

Merry Christmas Eve! This is the fifth time I’ve made toffee in the past 2 weeks, and each time I make it I’m amazed at how simple it is. It takes just three steps: whisk the ingredients over heat, spread the hot sugar mixture over a pan, and top it with whatever you want. A breeze. But the reason I say “simple” and not “easy” is because there is a bit of technique and elbow grease required: stirring non-stop for 10 minutes might give you unhappy risotto flashbacks, and the cold water candy test (detailed below) probably means this shouldn’t be a beginner’s first recipe. That said, once you have your toffee-legs, which are the toffee version of when a sailor gets his sea-legs, you’ll find this recipe really is a breeze. I use the same exact process here that I used in my Butter Rum Toffee recipe–the only difference is I’ve Irish-ed up the ingredients with coffee and whiskey. The amount of coffee crystals I used here keeps the coffee flavor on the mellow side, but if you want to punch it up, use a whole teaspoon. Just go to town on this thing.

IMG_0388

INGREDIENTS

1 cup butter
1 cup sugar
1/2 tsp instant coffee crystals
1/4 tsp salt
1 1/2 tbsp whiskey
1 cup semi-sweet chocolate chips
almonds, toasted and chopped (hazelnuts would rock here, too)

Just the Recipe link: Irish Coffee Toffee

DIRECTIONS

Line a sheet pan with a silicon mat or parchment paper. Set aside; youʼll need it ready, because the caramelizing process moves pretty quickly.

Melt butter in a saucepan over medium heat. Then whisk in the sugar, coffee crystals, salt, and whiskey, and continue to stir with the whisk while the mixture comes to a bubble. Be very careful not to touch the mixture at any point in this process; itʼll give you an incredibly nasty burn. Cook over medium flame, stirring constantly, for 7-10 minutes, until the mixture is almond-colored and passes this consistency test: take a glass of cold water and drizzle in a few drops of the mixture. If it turns into brittle strings and crystallizes at the bottom of the glass (reach in and test the piece with your fingers), it’s ready to go. If it’s still soft and malleable, continue to cook and stir, and test again in a minute or two. Be careful not to let it burn.

When itʼs ready, immediately pour onto the sheet thatʼs lining your sheet pan. Use a spatula to spread the mixture pretty thinly, and let cool for 2 minutes.

IMG_0369

*Clean-up tip: After you’ve spread the toffee onto the pan to start cooling, fill the saucepan with water and bring to a boil. This will dissolve the hard, sticky caramel and make it WAY easier to clean. You can also stir the whisk around in the boiling water, to break down any sugar stuck on its wires.*

Next, sprinkle over the chocolate chips. Give them a few minutes to melt, and then use a spatula to gently spread the melted chocolate over the top of the toffee, covering the whole surface. If you find that the chocolate chips arenʼt melting completely, pop the pan into a hot oven for 20 seconds, and the chocolate will be easily spreadable.

While the chocolate is still melty, sprinkle with almonds. Let the whole thing set completely, for at least two hours.

IMG_0372

When it’s completely set, break it up into chunky, uneven pieces. Store in a cool place where the chocolate won’t melt. Give as gifts or keep for yourself – and try not to eat it all in one day!

IMG_0390

Butter Rum Toffee.

Everything around me feels festive: My neighborhood takes holiday decorating pretty seriously, and for Christmas they’re breaking out all the seasonal decor, from lights and garlands to inflatable Snoopies sleeping on their doghouses. The five or so inches of snow I see from my window add a real coziness factor to a Sunday spent in the kitchen. And my first-ever grown-up Kelly’s Very Own Christmas Tree in my front window brings me a pride and joy so thoroughly adult that I almost want to keep the tree up til spring. As the song says, “it’s the most wonderful time of the year.” And I really believe that! I love the cooking, the singing, the decorating, the smiles, the spirit. This is a holiday that–at least in its modern, pseudo-secular incarnation–is all about generosity, sharing, and love. When you give a gift, the recipient feels awesome, you feel awesome, and through this bond the world gets a little more awesome for a little while. That’s pretty beautiful, whether you buy into the Bible stories or not.

IMG_0330

This is where toffee comes in. Whenever I receive a little bag of toffee as a Christmas present, I just get so excited about it. It’s so good. Sweet, buttery, crunchy, chewy, sticky…it’s everything a Christmas treat should be. So I’m planning to share a few yummy toffee recipes this Christmas season, starting with this, a lusciously warm and toasty Butter Rum Toffee.

IMG_0333

INGREDIENTS

1 cup butter
1 cup sugar
1 1/2 tbsp rum
1/2 tsp vanilla extract
1/4 tsp salt, plus a pinch or two more for sprinkling
1 cup semi-sweet milk chocolate chips (if you want it really chocolatey, add another 1/2 cup)
pecans, toasted and chopped

Just the Recipe link: Butter Rum Toffee

DIRECTIONS

Line a sheet pan with a silicon mat or parchment paper. Set aside; you’ll need it ready, because the caramelizing process moves pretty quickly.

Melt the butter in a saucepan over medium heat. Then whisk in the sugar, rum, vanilla, and salt, and continue to stir with the whisk while the mixture comes to a bubble. Be very careful not to touch the mixture at any point in this process; it’ll give you an incredibly nasty burn. Cook over medium flame, stirring constantly, for 7-10 minutes, until the mixture is almond-colored and passes this consistency test: take a glass of cold water and drizzle in a few drops of the mixture. If it turns into brittle strings and crystallizes at the bottom of the glass (reach in and test the piece with your fingers), it’s ready to go. If it’s still soft and malleable, continue to cook and stir, and test again in a minute or two. Be careful not to let it burn.

IMG_0306

Once it’s ready, immediately pour the toffee onto the silicone mat or parchment paper that’s lining your sheet pan. Use a spatula to spread the mixture pretty thinly – don’t worry if it’s uneven, it’s all part of the magic of toffee. Let cool for 2 minutes.

*Clean-up tip: After you’ve spread the toffee onto the pan to start cooling, fill the saucepan with water and bring to a boil. This will dissolve the hard, sticky caramel and make it WAY easier to clean. You can also stir the whisk around in the boiling water, to break down any sugar stuck on its wires.*

Next, sprinkle over the chocolate chips. Give them a few minutes to melt, and then use a spatula to gently spread the melted chocolate over the top of the toffee, covering the whole surface. If you find that the chocolate chips aren’t melting completely, pop the pan into a hot oven for 20 seconds, and the chocolate will be easily spreadable.

While the chocolate is still melty, sprinkle with pecans and a bit more salt. I topped half my toffee with pecans and salt, and the other half with just salt, so that a nut-free birthday girl could eat it.

IMG_0315

Let the whole thing set completely, for at least two hours. Then break it up into chunky, uneven pieces. Eat some of them (you gotta make sure it’s good, right?), and give the rest away as gifts before you eat it all yourself.IMG_0312

Czech Goulash: Updated Recipe.

Four years ago when I went to Prague, I ordered a dish of goulash at a little restaurant near our hostel. It was my first taste of goulash–my first heavenly taste of that paprika-y, hearty stuff–and I’ve loved it ever since. In fact, my goulash might be the first recipe I ever made that I can claim as a Kelly original. That recipe has lived through a few delicious incarnations as I’ve re-worked it through the years; I think this posting is the third version. And it’s by far my favorite. I’ve kept it simple and focused on my favorite flavors, most importantly the deep deep warmth of paprika, which absolutely rocks on a chilly winter day. An homage to my Bohemian relatives and a sweet memory of my trip to Prague, here is my updated recipe for Czech goulash!

Czech Goulash | KellyintheKitchen | olive oil, 1 large onion, 3 carrots, bay leaf, 2 lb stew beef, cubed, 3 cloves garlic, 3-4 tsp paprika, 2 tsp caraway seed, 1 tsp dried thyme, 15 oz canned crushed tomato, 4-6 cups cold water or stock, salt and pepper to taste, 2 tbsp corn starch, and garnishes: sour cream, green onion, marjoram/parsley

INGREDIENTS

olive oil
1 large onion, chopped
3 carrots, peeled and chopped
bay leaf
2 lb stew beef, cubed
3 cloves garlic
3-4 tsp paprika
2 tsp caraway seed
1 tsp dried thyme
15 oz canned crushed tomato
4-6 cups cold water or stock
salt, pepper to taste
2 tbsp corn starch
sour cream, green onion, and marjoram or parsley for serving

DIRECTIONS

Heat oil over medium in Dutch oven or other large soup pot. Add onions, carrots, and bay leaf, and cook until transparent. Then add the beef and cook until browned.

Stir in the garlic, paprika, thyme, and caraway seed. Cook for 2 minutes, until fragrant.

IMG_0182

Pour in the tomatoes and 4 cups of stock and add salt and pepper to taste. Bring to a boil, then lower the heat to a simmer. Cover and cook for 2 hours, stirring occasionally and adding more stock if necessary.

IMG_0196

After 2 1/2 hours, stir in the corn starch. Cook for another hour at least; I like to cook the goulash for a total of 4-5 hours if I have the time. We’re going for fall-apart tender beef that could almost float away in the broth/gravy/stew juices (or whatever they’re called).

Remove from heat and fish out the bay leaf. Serve with a scoop of sour cream and a sprinkling of green onion and parsley or marjoram. This stuff is amazing right out of the pot and only gets better as it sits in the fridge!

Czech Goulash | KellyintheKitchen | olive oil, 1 large onion, 3 carrots, bay leaf, 2 lb stew beef, cubed, 3 cloves garlic, 3-4 tsp paprika, 2 tsp caraway seed, 1 tsp dried thyme, 15 oz canned crushed tomato, 4-6 cups cold water or stock, salt and pepper to taste, 2 tbsp corn starch, and garnishes: sour cream, green onion, marjoram/parsley