Salmon Cakes and Baby Spinach Salad with Orange Vinaigrette.

On Friday night, I made baked salmon fillets for dinner. Intending to post the recipe afterward, I shot each step of the prep process – but when I sat down to eat, it was…just fine. Not great. And I tend not to blog about recipes that I don’t think are awesome or that I wouldn’t make again, so I decided not to write it up or post it here. Oh well, this happens fairly often, folks. I finished eating one of the fillets,  and I shredded up the second and put it in the fridge. I unenthusiastically figured I would make some kind of salad out of it. Meh. But then I thought, there is a lot I could do with this average-tasting salmon that would make it totally delicious! So I combed the internet a bit and found a recipe from Rachel Ray that really got me going. I adapted it a bit and the result is what you see here: a tasty dinner that sees an ugly duckling salmon fillet turned into a real swan of a meal (birds and fish – stop me if the metaphor-mixing gets to be too much). Long story short: “blah.” became “ta-da!”

IMG_8001

INGREDIENTS

for the salmon and salad:
1 egg
1 – 1 1/2 cups salmon, cooked and flaked (1 can of salmon will work here as well)
1 green onion, sliced thin
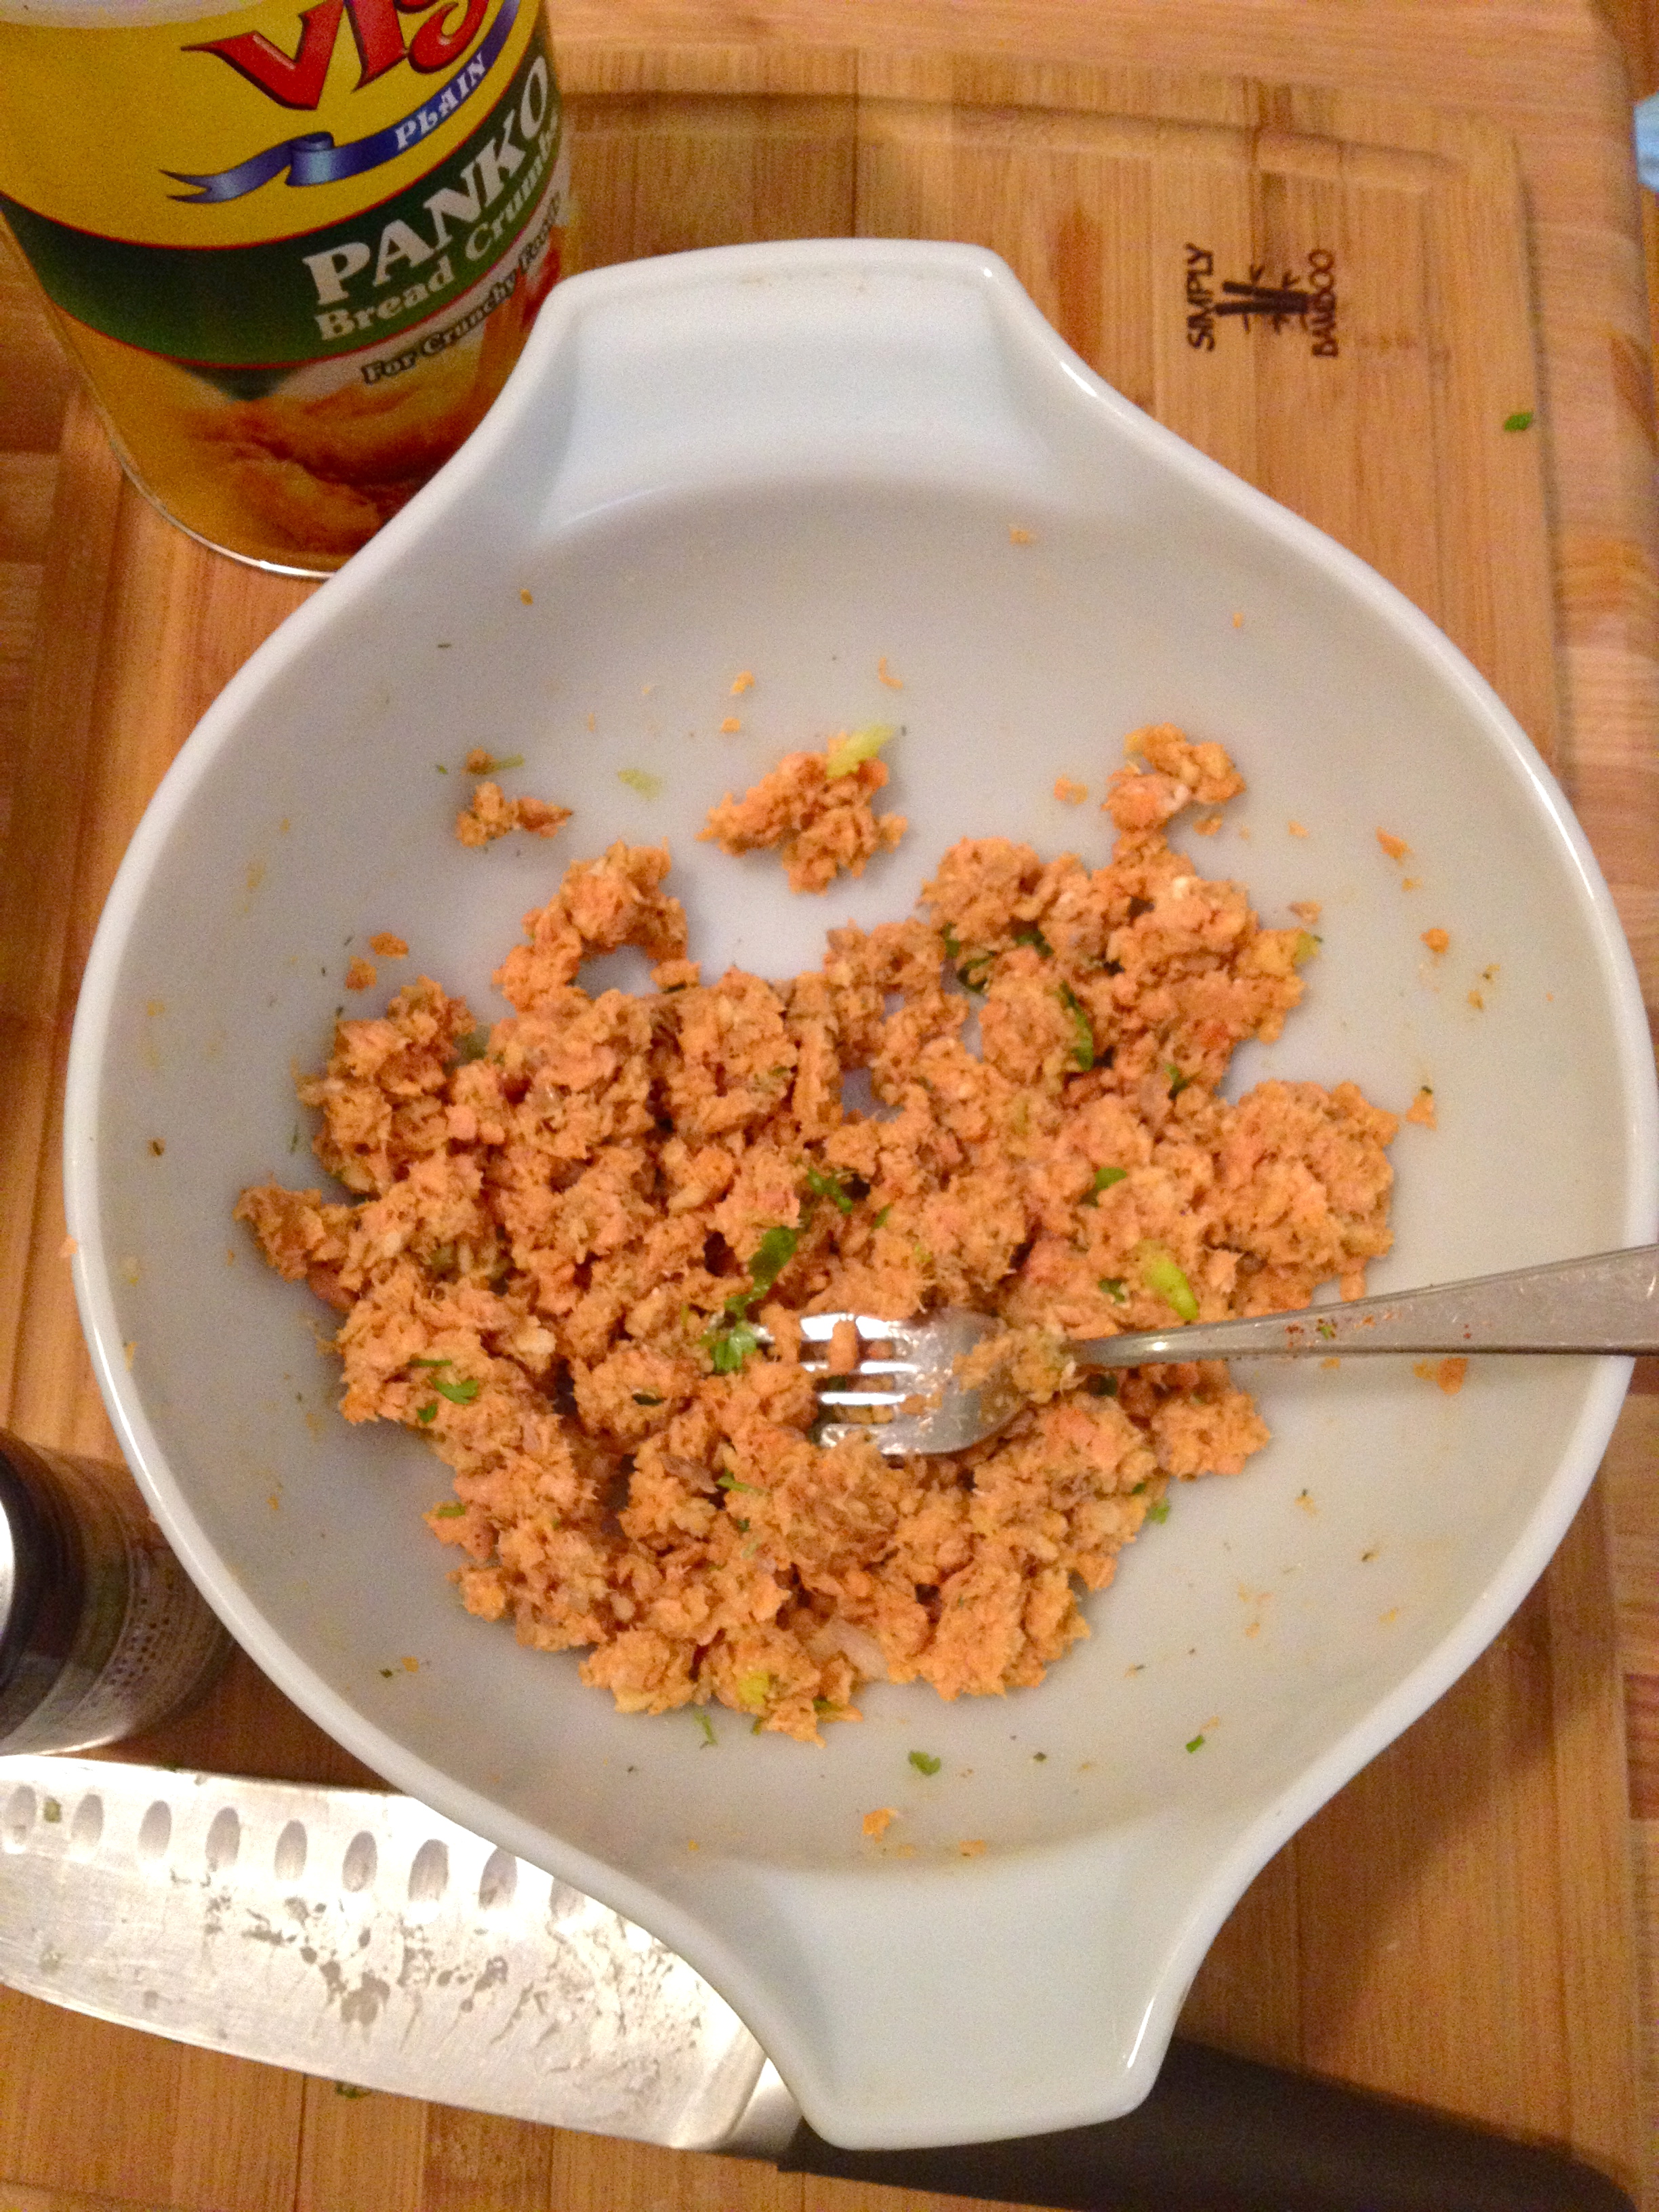
1/3 cup bread crumbs (I used Panko – use gluten-free bread crumbs if you like)
1 tsp of your favorite fish seasoning (I used Lake Shore Drive Seasoning from the Spice House – love this stuff!)
a squeeze or two of hot sauce (I use Sriracha)
a small handful of fresh parsley, chopped
a pinch of cayenne pepper
salt and pepper
a few tablespoons of vegetable oil (not olive oil or butter – we need it to have a pretty high smoke point)
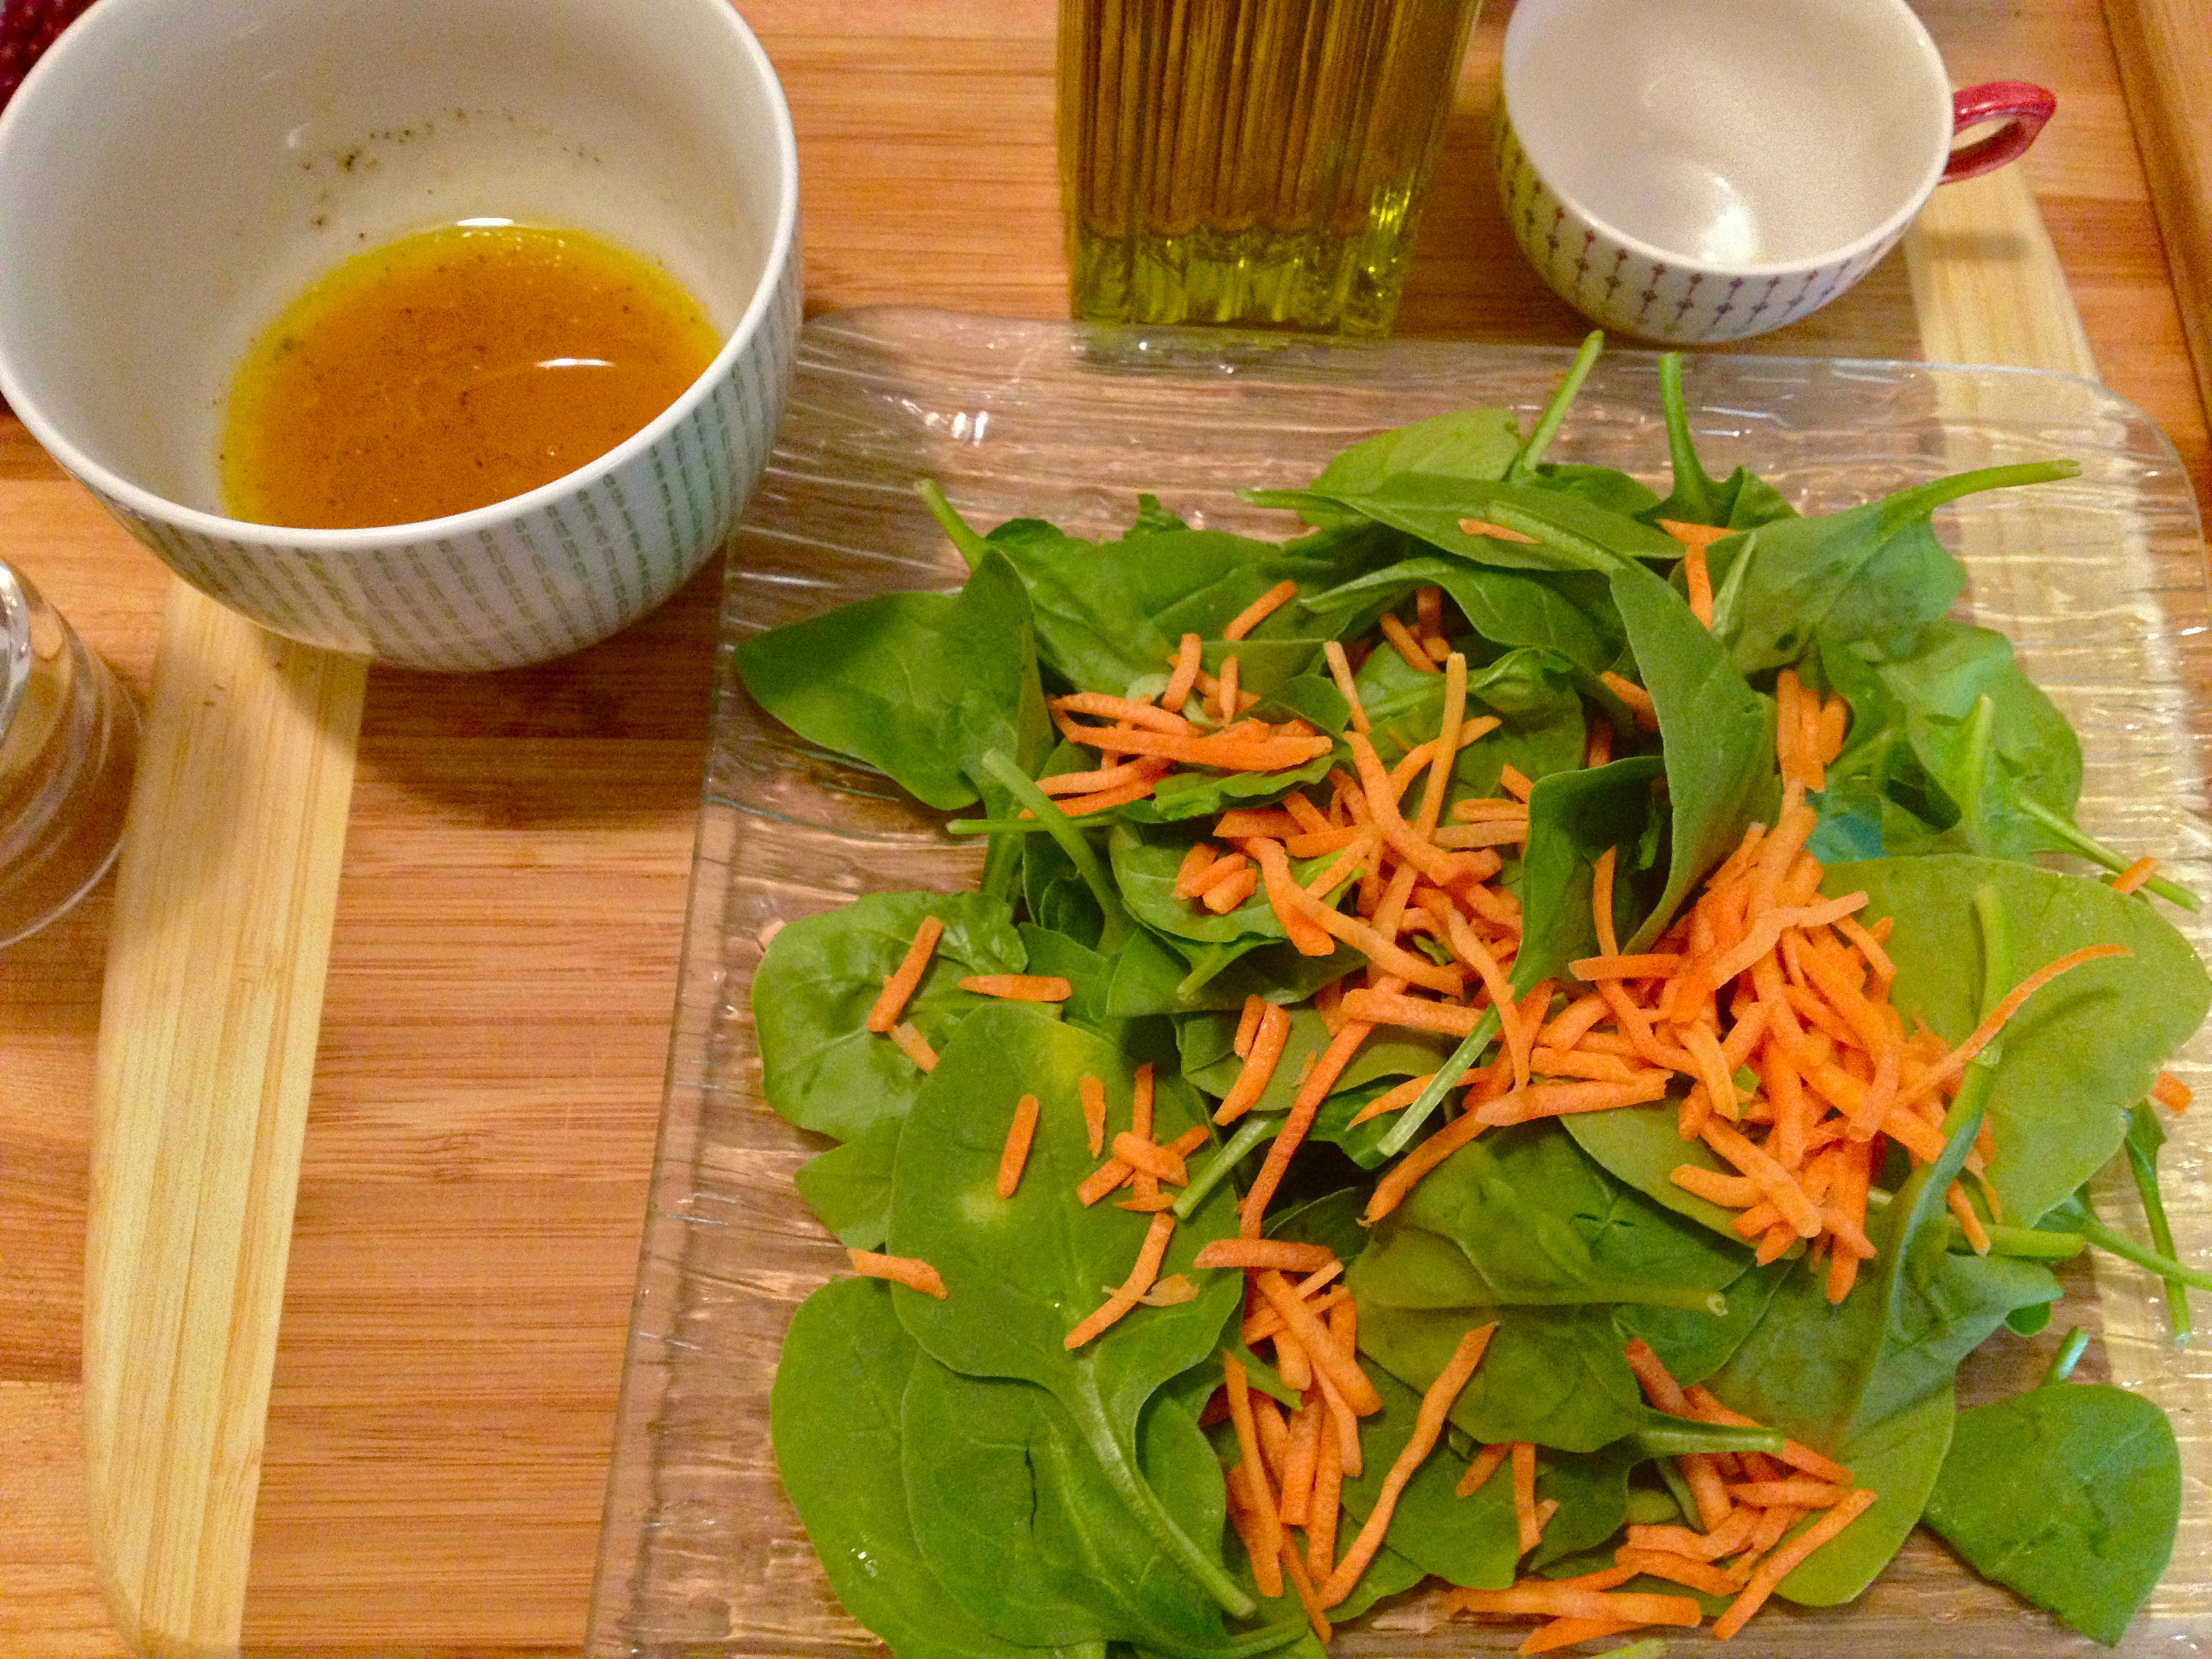
1 1/2 cups fresh baby spinach, washed and dried
shredded carrots or any other salad fixins’ you like

for the orange vinaigrette dressing:
1 tbsp orange juice
1 tsp red wine vinegar
3-4 tbsp extra virgin olive oil
salt and pepper to taste

Just the Recipe link: Salmon Cakes and Baby Spinach Salad with Orange Vinaigrette

DIRECTIONS

Get the pan going over medium heat (not medium high). We’ll add the oil in a little bit; for now, just heat the pan.

Crack the egg into a mixing bowl and add the salmon. Use a fork to mash up the salmon a little bit and combine it with the egg. Add green onion, bread crumbs, seasoning, hot sauce, parsley, cayenne pepper, and salt and pepper, and stir together to combine everything evenly.

IMG_7991

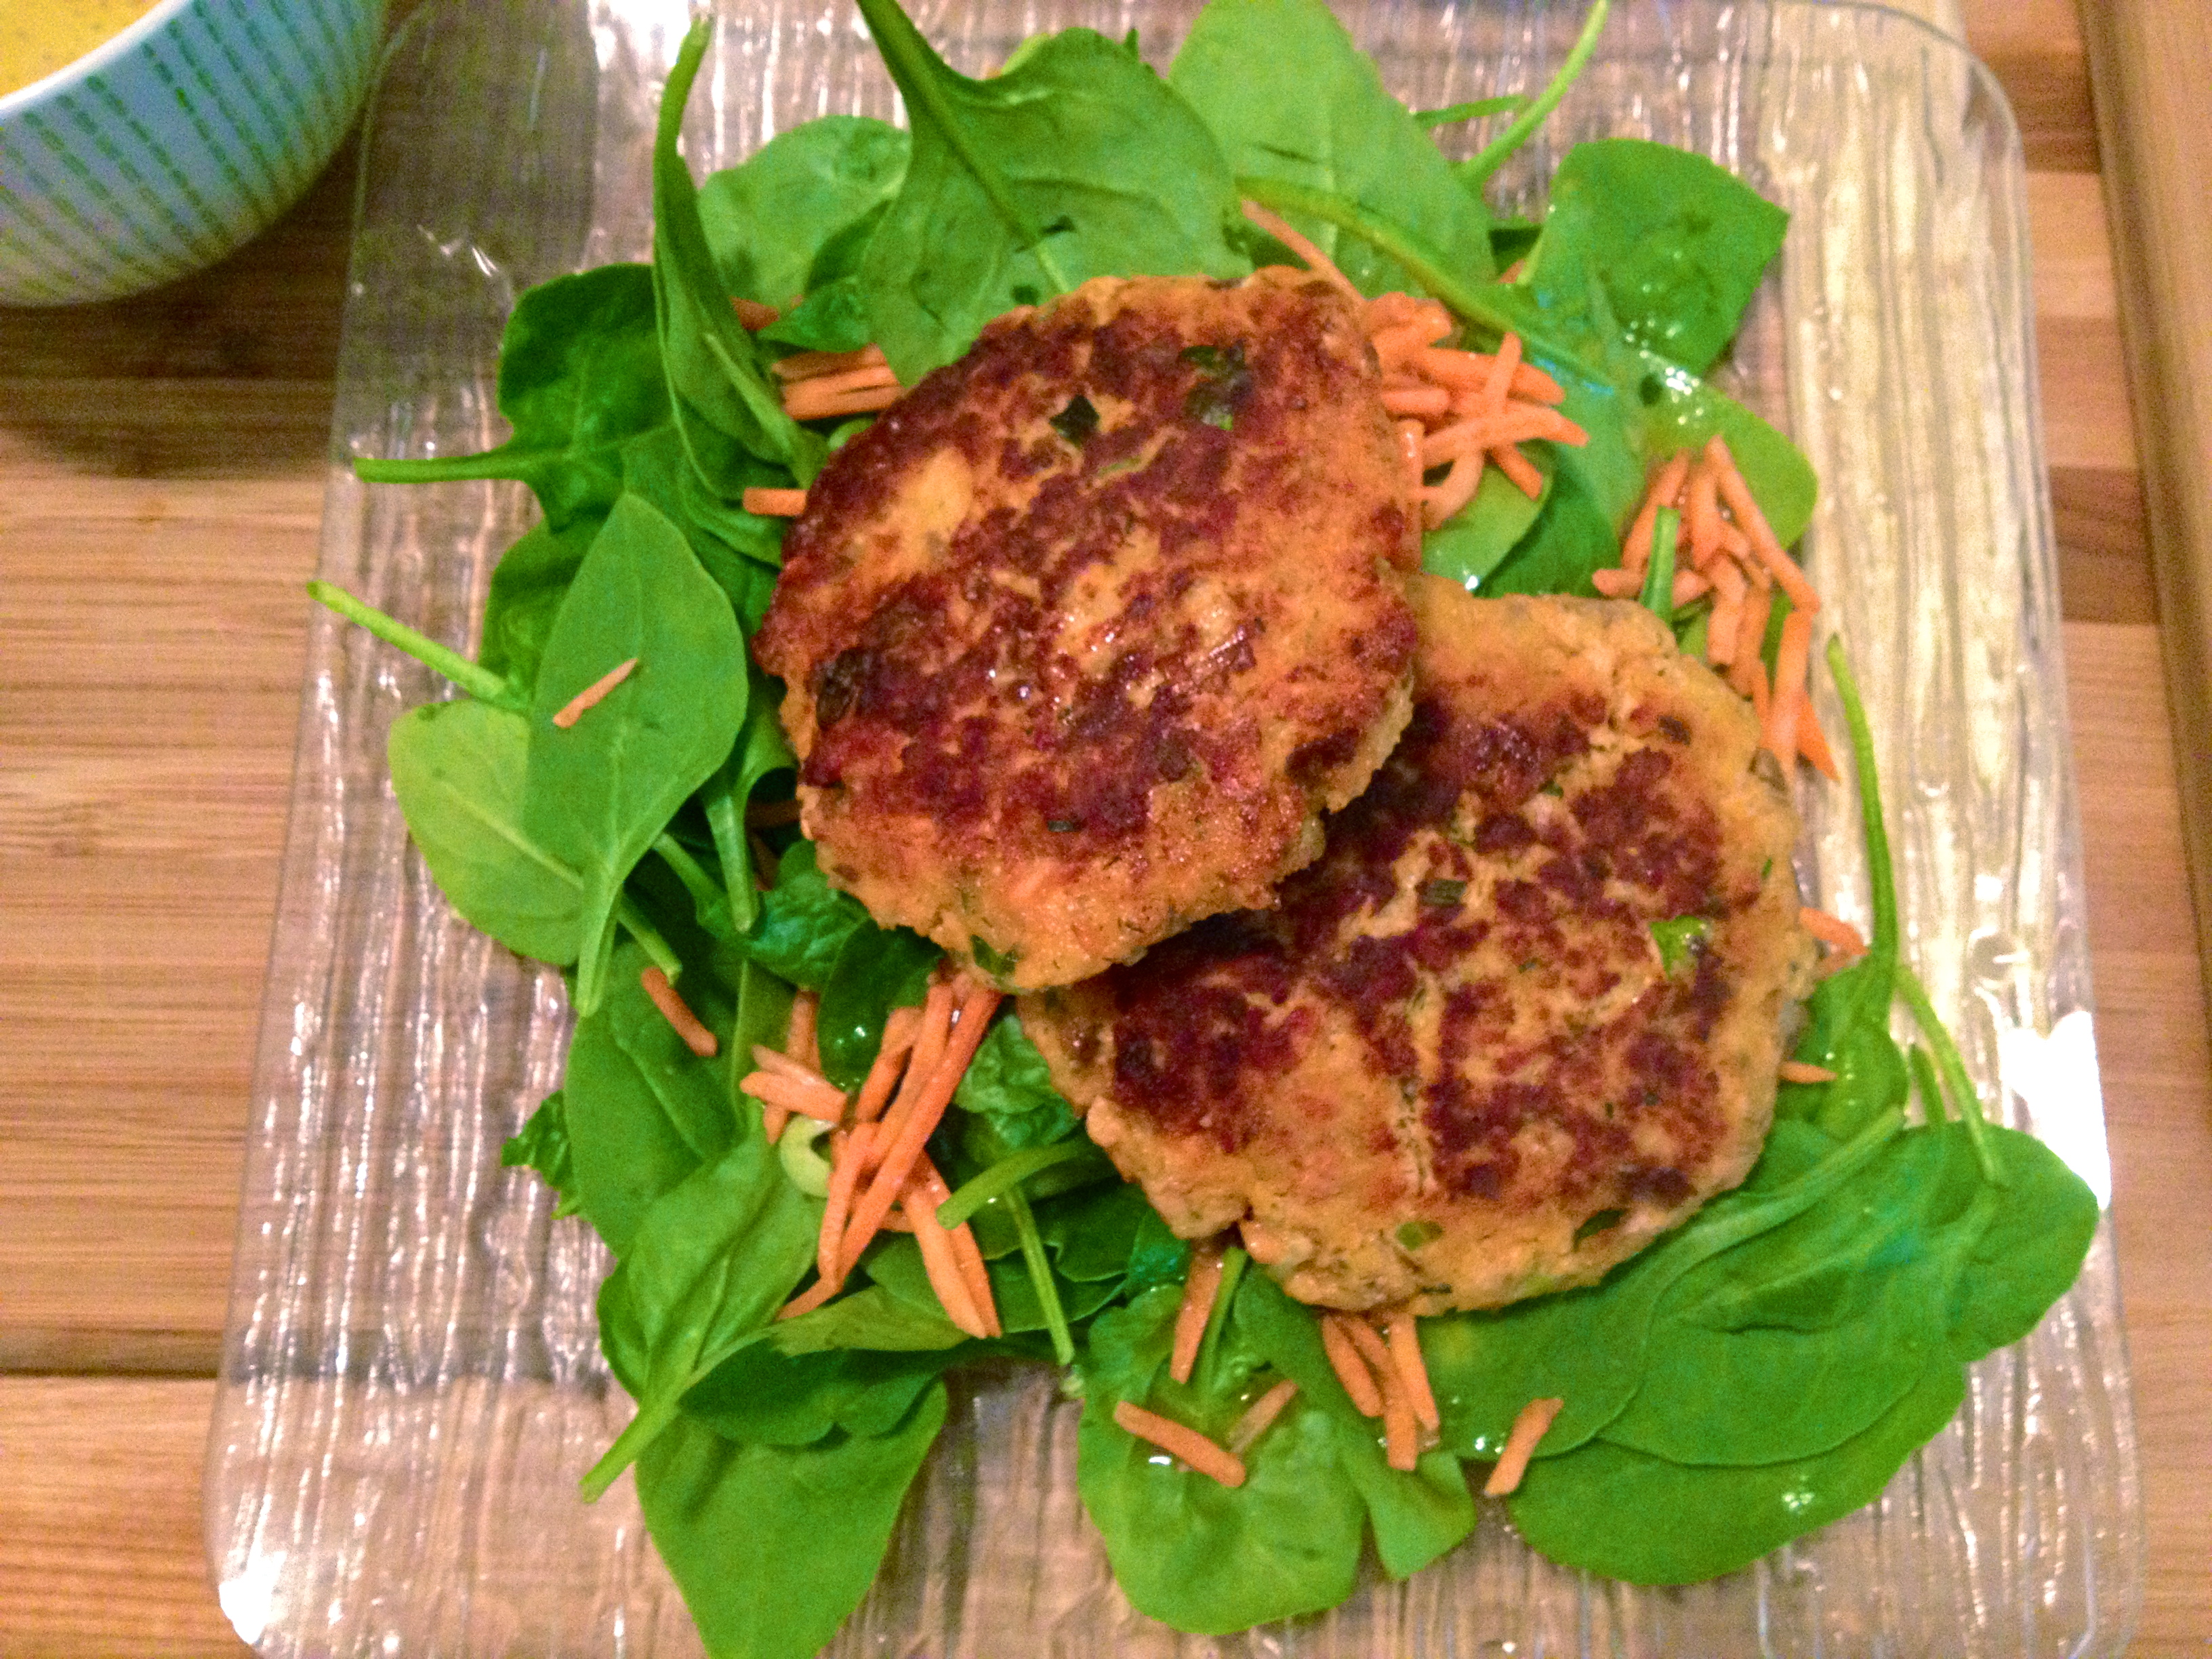
At this point, add the oil to the pan – just enough to cover the bottom. Let it get hot while you form the salmon into cakes. Divide the mixture into two even portions, and use your hands to shape each portion into a patty about 3/4 inch thick. Add them to the pan and cook until browned and a little bit crispy on each side. Mmm.

IMG_7994

While the cakes cook, prep the salad. I tossed the baby spinach onto a pretty plate and topped it with shredded carrots. Then make the dressing, which is incredibly easy. Just stir together all the ingredients with a fork.

IMG_7997

Then it’s just a matter of dressing the salad and plating the salmon cakes. Perch them right on top of the greens, and if you have any dressing leftover, drizzle a bit on the cakes. The orange is delicious here. I could hardly believe this was the boring salmon I had made the night before. Enjoy!

IMG_7998

Green Taco Burger Wraps.

I love lettuce wraps – I think I even prefer when things are wrapped in lettuce to any tortilla or bun (excluding hot dogs, of course). The cool crunch and the light freshness of the lettuce just seems to pair well with a lot of the foods that we think of as bun-worthy. This recipe for what I’m calling “green taco burger wraps” combines the best of cheeseburgers and tacos and wraps the whole thing in nice crunchy lettuce. The burger meat is spiced with cumin and oregano to give it a bit of Mexican flavor, and the toppings are all my taco favorites (especially avocado….mmmm). They’re easy and healthy and so delicious!

IMG_7911

INGREDIENTS

about 3/4 lb ground meat (I used beef)
1 egg
1/2 tsp cumin
1/2 tsp garlic powder
1/2 tsp paprika
1/4 tsp ground coriander
1/4 tsp cayenne pepper
salt and pepper to taste
red onion, diced
cheese, sliced (I used cheddar)
cilantro, rough chop
tomato, chopped
red pepper, raw or lightly sauteed
4 large lettuce leaves, rinsed and patted dry
avocado, sliced
green onion, sliced
1 lime, sliced

Just the Recipe link: Green Taco Burger Wraps

DIRECTIONS

First, season the burger meat. In a large bowl, add meat, egg, cumin, garlic powder, paprika, ground coriander, cayenne pepper, salt and pepper, and red onion to taste. I set the rest of the red onion aside in a little ramekin to top the burgers with later. Use your hands to mix all the ingredients together.

IMG_7900

That’s the only cooking prep you’ll do in this recipe. At this point, I set the meat aside to let the flavors hang out a bit while I chopped up everything else and put all the amazing toppings into their own little bowls.

IMG_7902

When everything else is ready to go, cook the burgers. First, use your hands to form them into small patties (we made two little patties per person). I cooked them on my beautiful new Le Creuset grill pan from Williams-Sonoma, but a regular grill or a pan can do the trick as well. Put your pan over medium high heat and lightly grease before adding the burgers. Cook until browned on each side and medium-rare in the middle (or however you like your burgers cooked!). Set aside for 5 minutes to let the meat rest.

IMG_7907

The next step is just assembly!

IMG_7904

I started with the lettuce wrapper, then laid the burger on top and placed the cheese on top of that, so it would get a little melty. Then it’s only a matter of topping to your heart’s content – cilantro, red pepper, red onion, green onion, avocado, and a finishing squeeze of lime make these a perfect fresh and healthy lunch. Before you take a bite, just wrap the lettuce around your taco-topped burger. Then dig right in!

IMG_7914

Loaded Chili.

Garnishes. Goodies. Fixins’. At least half the reason I love chili is the toppings you get to put on it. Oh, my, the toppings. This recipe is about making an amazing chili that will eventually become an Ode to Toppings, and I want you to use them all: avocado, cheese, cilantro, tomato—whatever your heart desires. And you know what? You are a great cook and a wonderful person, and you deserve a beautiful meal. So thank yourself for making this by plating it up like a work of art and garnishing the heck out of it. Heidi at 101 Cookbooks is the master at this. Here are some of her most gorgeously garnished soups: Split Pea, Broccoli Cheddar, Yellow Split Pea, and Posole in broth. Let life imitate art and load up this chili!

IMG_7707

INGREDIENTS

for the chili:
olive oil
1/2 onion, chopped
1/2 red bell pepper, chopped
2 cloves garlic, minced
1/4 tsp cayenne pepper
1 tsp oregano
1/2 tsp coriander
1/2 tsp cumin
1/4 tsp red pepper flakes
salt and pepper to taste
1 lb ground meat (I used pork)
1 28oz can diced tomatoes
2 cups stock (I used beef stock)
2 tbsp fresh cilantro, chopped
1 16oz can black beans, drained and rinsed
1 16 oz can corn, drained and rinsed

all the fixins’:
avocado, sliced
fresh cilantro, chopped
cheese, shredded
fresh tomato, chopped
onion or green onion, thinly sliced or minced
squeeze of lime

Just the Recipe link: Loaded Chili

DIRECTIONS

Heat oil in a pan and add onion and red pepper. Cook about 8 minutes, until softened.

IMG_7683

Add the garlic and the cayenne pepper, oregano, coriander, cumin, red pepper flakes, salt, and pepper. Stir and cook 1-2 minutes, until fragrant and yummy-smelling.

IMG_7687

Add the ground pork and use your spoon to break it up. Cook until browned, stirring occasionally.

IMG_7691

Once the meat is browned, pour in the canned tomatoes and the stock. Toss in a bay leaf for good measure. Bring to a boil and then turn down to a simmer. Simmer for 45 minutes.

IMG_7692

After 45 minutes have gone by, add the cilantro, corn, and beans, and simmer for another 15 minutes.

IMG_7699

Taste for seasoning and your chili is good to go! Now dress it up. And make it look beautiful, for heaven’s sake! You’re worth it.

IMG_7706

Chocolate Peanut Butter Cheesecake.

As ever, Nigella Lawson dishes out another perfect dessert recipe. There isn’t much need of an introduction for this beaut. I’ll just say that every step of the process is spoon-smackingly, bowl-lickingly good, and that the finished product is indulgent and fluffy and dreamy in every way. A graham cracker crust with bits of chocolate in it, filled with a smooth and creamy peanut butter cheesecake, and finished with a sweet, chocolate topping. Glamorous. Indulgent. Chocolate peanut butter cheese cake. Enjoy.

IMG_7471

PS I looked for the video footage from Nigella’s show of the episode for which she makes this cheesecake, but I couldn’t find it. It looks so dang amazing when she makes it, I’ve had it on my list for at least a year.

IMG_7469

INGREDIENTS

for crust:
12 graham crackers (or 1 1/2 packets, from a box of three 8-cracker packets) (sub any gluten-free cookies if you like)
4 tbsp butter, softened
1/4 cup salted peanuts
1/2 cup semi-sweet chocolate chips
1-2 tsp vegetable oil

for filing (all these ingredients must be at room temperature):
16 oz cream cheese or neufchatel cheese (I used one packet of low fat and 1 packet of full-fat)
3 eggs
3 egg yolks
3/4 cup sugar
heaping 1/2 cup of sour cream or Greek yogurt (I used non-fat Greek yogurt)
1 cup smooth peanut butter

for topping:
1/2 cup milk chocolate chips
3 tbsp brown sugar
1 scant cup sour cream or Greek yogurt

Just the Recipe link: Chocolate Peanut Butter Cheesecake

Let your puppy eat the pieces of graham cracker that you'll inevitably drop.
Let your puppy eat the pieces of graham cracker that you’ll inevitably drop.

DIRECTIONS

Preheat oven to 338 F (okay, so you can go with 350 F if you like and you’ll be fine. I converted this recipe from metric, and the original 170 C is exactly 338 F. I do what I’m told).

Next, the crust. In all honesty, crust is my favorite part of any cheesecake, and this one is awesome. One thing I didn’t do, but I think I will next time, is to start by pulverizing the chocolate chips in the food processor, so that they’ve broken up before the rest of the ingredients are added. This time, I added all the crust ingredients at once and pulsed until they came together, drizzling in just enough of the vegetable oil until the crust started to hold together. There were some chunks of chocolate left un-blitzed, so next time I’ll blitz the chocolate separately first.

IMG_7441

Turn it out into a well-greased spring-form pan and use your fingers to press it into the bottom and up the sides. Put the crust in the fridge while you make the filling.

IMG_7442

In a food processor, combine all the filling ingredients until totally smooth. Jeez, that’s beautiful.

IMG_7446

Pour filling into the graham cracker shell. Spread it gently into all the “corners ” (can circles have corners?), careful not to mess with the tenuous architecture of the crust.

IMG_7450

Bake for about an hour, but check it as it nears the end of the baking time. You want the top to be set and no longer wet or sticky, but for the inside to still be jiggly. In Nigella’s words, we’re looking for the center to have “just a hint of inner-thigh wibble.” Perfection. But I forgot to take a picture before I doused it in chocolate. See next step.

When the cheesecake is nearing the end of it’s bake time, melt all the topping ingredients in a pan over low until they come together. Pour over the cheesecake once it comes out of the oven, and then pop it right back into the oven for about 10 minutes, so that the topping can set.

IMG_7460

Take it out of the oven and pop it right into the fridge to chill overnight, cake pan and all (careful when you take it out of the pan though, as the chocolate topping is prone to stick to the sides). To be honest, I made this cheesecake to give to friends, so all it got was a quick chill in the freezer for an hour and then another hour or so in the fridge until we ate it. So the overnight chilling time isn’t mandatory, but it is nice.

IMG_7468

Scarborough Fair Roast Chicken.

Are you going to Scarborough Fair?
Parsley, sage, rosemary, and thyme
Remember me to the one who lives there
She once was a true love of mine.

If you love this song as I do, it’s likely because you know the beautiful version sung by Simon and Garfunkel. And if you love it as I do, you might also use it as a guide to seasoning chicken (more on that later). Knowing it was much older than a 60s hit, I decided to comb the web a bit to learn about the history of the song. There’s a pretty interesting Wikipedia article on this old ballad that gives a bit of background; the playfulness of the lyrics is what interests me most. Part of the song is from the point of view of a young man who instructs his love to do impossible tasks for him, and then it switches to her point of view. She gives him equally impossible tasks—and their relationship depends on the completion of these tasks. It’s sweet and a little goofy, despite the utterly mournful vibe of the S&G hit.

But when you really pay attention to the words of “Scarborough Fair,” it doesn’t make sense, at least to me, why the four herbs (parsley, sage, rosemary, and thyme) are mentioned in every single verse. They don’t have anything to do with the rest of the song! For me, this lovely herbal repetition has dictated the way I season chicken dishes for as long as I’ve been cooking (so it’s no surprise that parsley, sage, rosemary, and thyme feature in my whole roast chicken as well). But since I’m sure the point wasn’t to help people flavor meat, I did some Googling to see if there was an explanation. I found a few theories, my favorite of which says that these four herbs, when used together, ward off the evil eye. So look away, all you devils out there—this chicken is protected by musical magic! Taste the magic, people.

I have one serving suggestion that I will repeat at the end of the recipe, because it really is a good idea: make sure to have a crusty baguette on hand, because you’re going to want to sop up those heavenly juices.

IMG_7451

INGREDIENTS

1 whole chicken, rinsed and patted dry
olive oil (regular, not extra virgin)
1 tbsp dried parsley
1 tsp dried sage
1 tsp dried rosemary
1 tbsp dried thyme
1/2 tsp garlic powder
1/4 tsp cayenne pepper
2 bay leaves
salt and pepper to taste

Just the Recipe link: Scarborough Fair Roast Chicken

DIRECTIONS

Preheat oven to 400 F.

Put your chicken in a pan, legs- and breasts-side down, and drizzle with olive oil. Combine the parsley, sage, rosemary, thyme, garlic powder, cayenne pepper, salt, and pepper, and sprinkle half over the chicken. Then flip the chicken so that the legs and breasts are facing up, and repeat the olive-oil-drizzling and the spice-sprinkling. You could massage the spices into the chicken a bit if you like; I didn’t feel like it today. It’s the cook’s prerogative.

IMG_7453

Pop it in the oven for about an hour and 15 minutes, depending on the size of your bird. It’s done when the juices run clear and the meat has lost its inner pinkness.

IMG_7461

That’s all! Roast chicken is incredibly easy. Definitely not the kind of task that the young man in “Scarborough Fair” would have requested of his lover. And when you eat this, you’ll enjoy it so much more if you have a nice crusty loaf of bread to dip into the juices—sometimes I think they’re the star of the show, they’re just that good.

IMG_7473

Celery Root and Sweet Potato Soup.

I’ve been wanting to try this type of thing for a while. Have you ever noticed, while you wander through the grocery store, a really knobby, homely-looking reject vegetable? One that looks like something went wrong when a normal vegetable was growing and it came out all messed-up? That’s celery root, also called celeriac. It’s notorious in the culinary world as one of those foods that many home cooks tend to shy away from, never knowing its versatility and great flavor. I hope to learn a lot more about celery root and to have some more recipes up here in the near future! For now, this warming, pale orange soup is just lovely, despite celeriac’s homeliness. Thank you to Frugal Feeding for the inspiration.

IMG_7268

INGREDIENTS

2 tbsp butter, divided (or skip the butter and just stick with oil)
olive oil (any oil really will work  – I used sunflower oil. Because I felt like it.)
2 small onions, diced
2 stalks celery, diced
2 cloves garlic, minced
1 small celery root, peeled and diced
1 large sweet potato, peeled and diced
4-5 cups vegetable or chicken stock
thyme, paprika, salt, pepper to taste (I used a small palmful of each)
bay leaf
1/2 – 1 cup half and half
fresh parsley for garnish

Just the Recipe link: Celery Root and Sweet Potato Soup

DIRECTIONS

Heat oil and, if using, 1 tbs if butter in a large soup pot, and add onion and celery. Cook until translucent, stirring occasionally. When the onions are nearly there, stir in the garlic.

IMG_7253

Add the celery root and sweet potato and cook 5 minutes.

Next, pour in the stock and add your thyme, paprika, salt, pepper, and bay leaf. If you’re using butter, add the second tbsp here and stir in to melt. Simmer, stirring occasionally, until the sweet potato and celery root are totally soft.

IMG_7256

Remove from heat and puree in batches, either using a blender or food processor, or, if you’re lucky enough to have one (I do not!) use an immersion blender.

IMG_7260

Pour in the half and half and stir, and you’re ready to serve! Garnish with fresh chopped parsley. I had a nice little lunch of this soup with a butternut squash and green onion quesadilla.

IMG_7262